This tutorial series will teach you the basics of building an ASP.NET MVC 5 Web application using Visual Studio 2013 and Visual Basic. A Visual Studio Express For Web project with VB source code is available to accompany this series which you can download.
The tutorial series comprises 11 sections in total. They cover the basics of web development using the ASP.NET MVC framework and the Entity Framework for data access. They are intended to be followed sequentially as each section builds on the knowledge imparted in the previous sections. The navigation path through the series is as follows:
- Getting Started
- Adding a Controller
- Adding a View
- Adding a Model
- Creating a Connection String and Working with SQL Server LocalDB
- Accessing Your Model's Data from a Controller
- Examining the Edit Methods and Edit View
- Adding Search
- Adding a New Field
- Adding Validation
- Examining the Details and Delete Methods
10. Adding Validation
In this this section you'll add validation logic to the Movie model, and you will ensure that the validation rules are enforced any time a user attempts to create or edit a movie using the application you have built so far.
Keeping Things DRY
One of the core design tenets of software development is DRY ("Don't Repeat Yourself"). ASP.NET MVC encourages you to specify functionality or behavior only once, and then have it be reflected everywhere in an application. This reduces the amount of code you need to write and makes the code you do write less error prone and easier to maintain.
The validation support provided by ASP.NET MVC and Entity Framework Code First is a great example of the DRY principle in action. You can declaratively specify validation rules in one place (in the model class) and the rules are enforced everywhere in the application.
Let's look at how you can take advantage of this validation support in the movie application.
Adding Validation Rules to the Movie Model
You'll begin by adding some validation logic to the Movie class.
Open the Movie.vb file. DataAnnotations provides a built-in set of validation attributes that you can apply declaratively to any class or property. (It also contains formatting attributes like DataType that help with formatting and don't provide any validation.)
Now update the Movie class to take advantage of the built-in Required, StringLength, RegularExpression, and Range validation attributes. Replace the Movie class with the following:
Public Class Movie
    Public Property ID As Integer

    <StringLength(60, MinimumLength:=3)>
    Public Property Title As String

    <Display(Name:="Release Date")>
    <DataType(DataType.Date)>
    <DisplayFormat(DataFormatString:="{0:yyyy-MM-dd}", ApplyFormatInEditMode:=True)>
    Public Property ReleaseDate As DateTime

    <RegularExpression("^[A-Z]+[a-zA-Z''-'\s]*$")>
    <Required>
    <StringLength(30)>
    Public Property Genre As String

    <Range(1, 100)>
    <DataType(DataType.Currency)>
    Public Property Price As Decimal

    <RegularExpression("^[A-Z]+[a-zA-Z''-'\s]*$")>
    <StringLength(5)>
    Public Property Rating As String
End Class
The StringLength attribute sets the maximum length of the string for validation purposes, and also sets this limitation on the database when you use Code First. Therefore the database schema will change. Right click on the Movies table in Server explorer and click Open Table Definition:
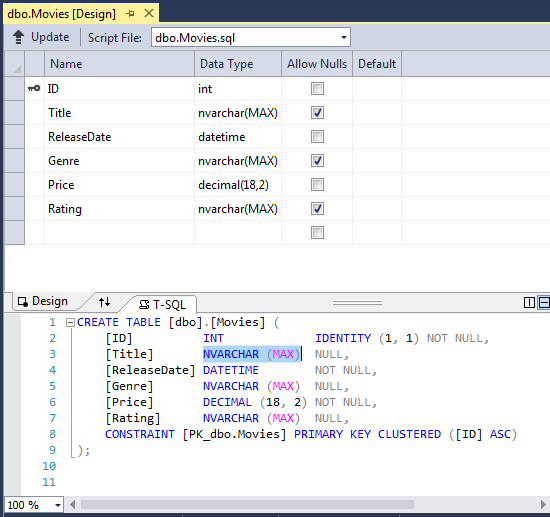
In the image above, you can see all the string fields are set to NVARCHAR (MAX). We will use migrations to update the schema. Build the solution, and then open the Package Manager Console window and enter the following commands:
add-migration DataAnnotations
update-database
When this command finishes, Visual Studio opens the class file that defines the new DbMIgration derived class with the name specified (DataAnnotations), and in the Up method you can see the code that updates the schema constraints:
Public Overrides Sub Up()
    AlterColumn("dbo.Movies", "Title", Function(c) c.String(maxLength := 60))
    AlterColumn("dbo.Movies", "Genre", Function(c) c.String(nullable := False, maxLength := 30))
    AlterColumn("dbo.Movies", "Rating", Function(c) c.String(maxLength := 5))
End Sub
The Genre field is are no longer nullable (that is, you must enter a value). The Rating field has a maximum length of 5 and Title has a maximum length of 60. The minimum length of 3 on Title and the range on Price did not create schema changes.
Examine the Movie schema:
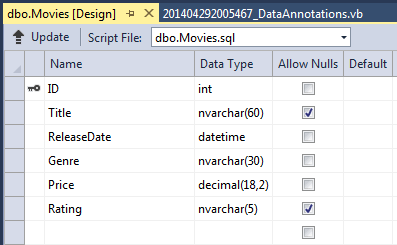
The string fields show the new length limits and Genre is no longer checked as nullable.
The validation attributes specify behavior that you want to enforce on the model properties they are applied to. The Required and MinimumLength attributes indicates that a property must have a value; but nothing prevents a user from entering white space to satisfy this validation. The RegularExpression attribute is used to limit what characters can be input. In the code above, Genre and Rating must use only letters (white space, numbers and special characters are not allowed). The Range attribute constrains a value to within a specified range. The StringLength attribute lets you set the maximum length of a string property, and optionally its minimum length. Value types (such as decimal, int, float, DateTime) are inherently required and don't need the Required attribute.
Code First ensures that the validation rules you specify on a model class are enforced before the application saves changes in the database. For example, the code below will throw a DbEntityValidationException exception when the SaveChanges method is called, because several required Movie property values are missing:
Dim db = New MovieDbContext()
Dim movie = New Movie()
movie.Title = "Gone with the Wind"
db.Movies.Add(movie)
db.SaveChanges() ' <= Will throw server side validation exception
The code above throws the following exception:
Validation failed for one or more entities. See 'EntityValidationErrors' property for more details.
Having validation rules automatically enforced by the .NET Framework helps make your application more robust. It also ensures that you can't forget to validate something and inadvertently let bad data into the database.
Validation Error UI in ASP.NET MVC
Run the application and navigate to the /Movies URL.
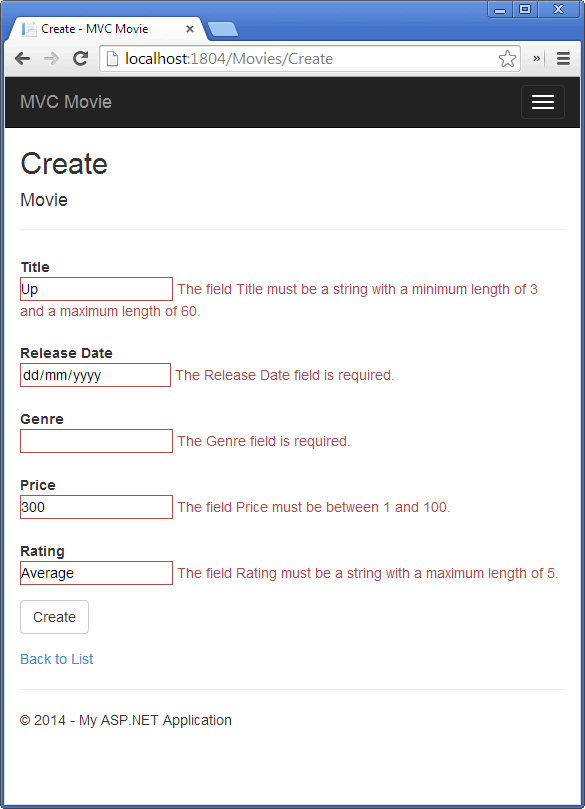
Click the Create New link to add a new movie. Fill out the form with some invalid values. As soon as jQuery client side validation detects the error, it displays an error message.
Note to support jQuery validation for non-English locales that use a comma (",") for a decimal point, you must include the NuGet globalize as described in section 7 of this tutorial.
Notice how the form has automatically used a red border color to highlight the text boxes that contain invalid data and has emitted an appropriate validation error message next to each one. The errors are enforced both client-side (using JavaScript and jQuery) and server-side (in case a user has JavaScript disabled).
A real benefit is that you didn't need to change a single line of code in the MoviesController class or in the Create.vbhtml view in order to enable this validation UI. The controller and views you created earlier in this tutorial automatically picked up the validation rules that you specified by using validation attributes on the properties of the Movie model class. Test validation using the Edit action method, and the same validation is applied.
The form data is not sent to the server until there are no client side validation errors. You can verify this by putting a break point in the HTTP Post method, by using the fiddler tool, or the IE F12 developer tools.
How Validation Occurs in the Create View and Create Action Method
You might wonder how the validation UI was generated without any updates to the code in the controller or views. The next listing shows what the Create methods in the MovieController class look like. They're unchanged from how you created them earlier in this tutorial.
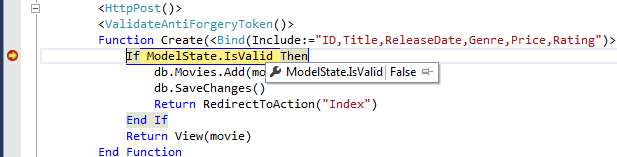
' GET: /Movies/Create
Function Create() As ActionResult
    Return View()
End Function

' POST: /Movies/Create
'To protect from overposting attacks, please enable the specific properties you want to bind to, for
'more details see http://go.microsoft.com/fwlink/?LinkId=317598.
<HttpPost()>
<ValidateAntiForgeryToken()>
Function Create(<Bind(Include:="ID,Title,ReleaseDate,Genre,Price,Rating")> ByVal movie As Movie) As ActionResult
    If ModelState.IsValid Then
        db.Movies.Add(movie)
        db.SaveChanges()
        Return RedirectToAction("Index")
    End If
    Return View(movie)
End Function
The first (HTTP GET) Create action method displays the initial Create form. The second (<HttpPost()>) version handles the form post. It checks the ModelState.IsValid property to check whether the movie has any validation errors. This property returns false if the ModelState dictionary has any validation errors registered with it and the Create method re-displays the form. If there are no errors (and ModelState.IsValid is true), the method saves the new movie in the database. In our movie example, the form is not posted to the server when there are validation errors detected on the client side; the second Create method is never called. If you disable JavaScript in your browser, client validation is disabled and the HTTP POST Create method calls ModelState.IsValid to check whether the movie has any validation errors.
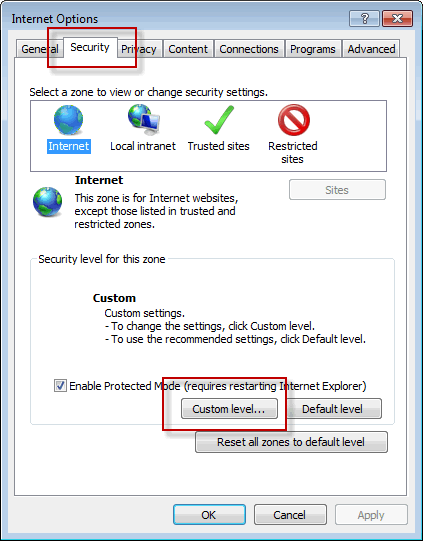
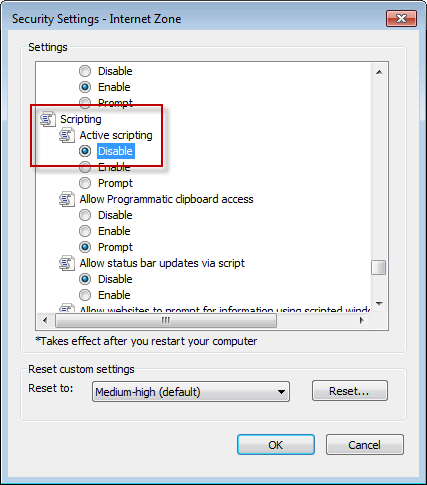
You can set a break point in the HttpPost Create method and verify the method is never called; client side validation will not submit the form data when validation errors are detected. If you disable JavaScript in your browser, then submit the form with errors, the break point will be hit. You still get full validation without JavaScript. The following image shows how to disable JavaScript in Internet Explorer.
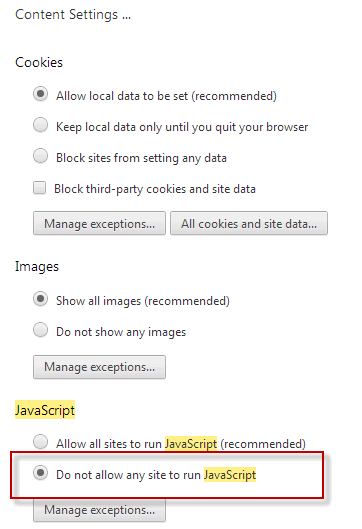
The following image shows how to disable JavaScript in the Chrome browser.
The facility to enable/disable JavaScript in more recent versions of FireFox has been removed. However, there are browser plugins available that provide this option.
Below is the Create.vbhtml view template that you scaffolded earlier in the tutorial. It's used by the action methods shown above both to display the initial form and to redisplay it in the event of an error.
@ModelType MvcMovie.Models.Movie
@Code
    ViewData("Title") = "Create"
End Code

<h2>Create</h2>

@Using (Html.BeginForm())
    @Html.AntiForgeryToken()

    @<div class="form-horizontal">
        <h4>Movie</h4>
        <hr />
        @Html.ValidationSummary(true)
        <div class="form-group">
            @Html.LabelFor(Function(model) model.Title, New With { .class = "control-label col-md-2" })
            <div class="col-md-10">
                @Html.EditorFor(Function(model) model.Title)
                @Html.ValidationMessageFor(Function(model) model.Title)
            </div>
        </div>

        @* Other fields removed for brevity *@

        <div class="form-group">
            <div class="col-md-offset-2 col-md-10">
                <input type="submit" value="Create" class="btn btn-default" />
            </div>
        </div>
    </div>
End Using

<div>
    @Html.ActionLink("Back to List", "Index")
</div>

@Section Scripts
    @Scripts.Render("~/bundles/jqueryval")
End Section
Notice how the code uses an Html.EditorFor helper to output the <input> element for each Movie property. Next to this helper is a call to the Html.ValidationMessageFor helper method. These two helper methods work with the model object that's passed by the controller to the view (in this case, a Movie object). They automatically look for validation attributes specified on the model and display error messages as appropriate.
What's really nice about this approach is that neither the controller nor the Create view template knows anything about the actual validation rules being enforced or about the specific error messages displayed. The validation rules and the error strings are specified only in the Movie class. These same validation rules are automatically applied to the Edit view and any other views templates you might create that edit your model.
If you want to change the validation logic later, you can do so in exactly one place by adding validation attributes to the model (in this example, the Movie class). You won't have to worry about different parts of the application being inconsistent with how the rules are enforced - all validation logic will be defined in one place and used everywhere. This keeps the code very clean, and makes it easy to maintain and evolve. And it means that that you'll be fully honoring the DRY principle.
Using DataType Attributes
Open the Movie.vb file and examine the Movie class. The System.ComponentModel.DataAnnotations namespace provides formatting attributes in addition to the built-in set of validation attributes. We've already applied a DataType enumeration value to the ReleaseDate and to the Price fields:
<DataType(DataType.Date)>
Public Property ReleaseDate As DateTime

<DataType(DataType.Currency)>
Public Property Price As Decimal
The DataType attributes only provide hints for the view engine to format the data (and supply attributes such as<a> for URL's and <a href="mailto:EmailAddress.com"> for email. You can use the RegularExpression attribute to validate the format of the data. The DataType attribute is used to specify a data type that is more specific than the database intrinsic type, they are not validation attributes. In this case we only want to keep track of the date, not the date and time. The DataType Enumeration provides for many data types, such as Date, Time, PhoneNumber, Currency, EmailAddress and more. The DataType attribute can also enable the application to automatically provide type-specific features. For example, a mailto: link can be created for DataType.EmailAddress, and a date selector can be provided for DataType.Date in browsers that support HTML5. The DataType attributes emits HTML 5 data- (pronounced data dash) attributes that HTML 5 browsers can understand. The DataType attributes do not provide any validation.
DataType.Date does not specify the format of the date that is displayed. By default, the data field is displayed according to the default formats based on the server's CultureInfo.
The DisplayFormat attribute is used to explicitly specify the date format:
<DisplayFormat(DataFormatString:="{0:yyyy-MM-dd}", ApplyFormatInEditMode:=True)>
Public Property ReleaseDate As DateTime
The ApplyFormatInEditMode setting ensures that the specified formatting is also be applied when the value is displayed in a text box for editing. (You might not want that for some fields - for example, for currency values, you might not want the currency symbol in the text box for editing.)
You can use the DisplayFormat attribute by itself, but it's generally a good idea to use the DataType attribute also. The DataType attribute conveys the semantics of the data as opposed to how to render it on a screen, and provides the following benefits that you don't get with DisplayFormat:
- The browser can enable HTML5 features (for example to show a calendar control, the locale-appropriate currency symbol, email links, etc.).
- By default, the browser will render data using the correct format based on your locale.
- The DataType attribute can enable MVC to choose the right field template to render the data (theDisplayFormat if used by itself uses the string template). For more information, see Brad Wilson's ASP.NET MVC 2 Templates. (Though written for MVC 2, this article still applies to the current version of ASP.NET MVC.)
If you use the DataType attribute with a date field, you have to specify the DisplayFormat attribute also in order to ensure that the field renders correctly in Chrome browsers. For more information, see this StackOverflow thread.
<Range(GetType(DateTime), "1/1/1966", "1/1/2020")>
Public Property ReleaseDate As DateTime
You will need to disable jQuery date validation to use the Range attribute with DateTime. It's generally not a good practice to compile hard dates in your models, so using the Range attribute and DateTime is discouraged.
The following code shows combining attributes on one line:
<Display(Name:="Release Date"), DataType(DataType.Date)>
Public Property ReleaseDate As DateTime

<RegularExpression("^[A-Z]+[a-zA-Z''-'\s]*$"), Required, StringLength(30)>
Public Property Genre As String

<Range(1, 100), DataType(DataType.Currency)>
Public Property Price As Decimal

<RegularExpression("^[A-Z]+[a-zA-Z''-'\s]*$"), StringLength(5)>
Public Property Rating As String
In the next part of the series, we'll review the application and make some improvements to the automatically generated Details and Delete methods.
