Overview of the tasks
The process involves a number of steps:
- Configure and enable cookie-based authentication
- Configure Protected resources
- Secure your credentials
- Store the credentials
- Create a login form
Configure Cookie-based Authentication
The next step is to enable the correct middleware in the request pipeline
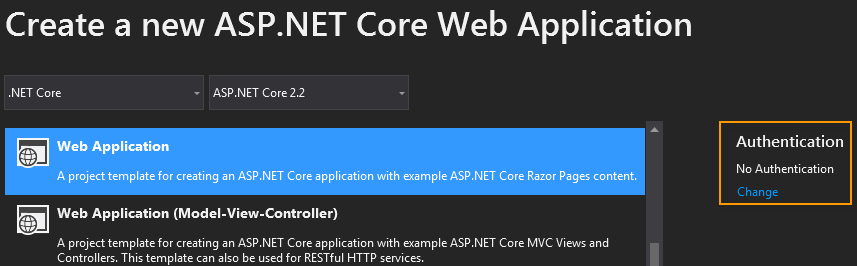
- Create a new Razor Pages application named AuthenticationSample (
dotnet new webappfrom the command line). If you are using Visual Studio to create the application, ensure that Authentication is left at "No Authentication".
- Add a new folder to the Pages directory, named Admin.
- Add a new Razor Page to the Admin folder named Index. If you are using
VS Code, you can do this by executing
dotnet new page -o Pages/Admin
    -n Index -na AuthenticationSample.Pages.Admin
from the terminal. - Change the code in Index.cshtml to read as follows:
- Run the application and navigate to
https://localhost:xxxx/Admin(wherexxxxrepresents the port number the application is running on). You should be able to reach the page you just created without any issues. - In Startup.cs, add
using Microsoft.AspNetCore.Authentication.Cookies;to the top of the file. - Change the
ConfigureServicesmethod so that it looks like this:
In this step, you configured Cookie-based authentication, setting the login page to the home page. Then you configured the Admin folder to prevent unauthorised users being able to access anything in it.
-
Add
app.UseAuthentication();to theConfiguremethod, just beforeapp.UseMvc();. This step adds authentication middleware to the pipeline so that it is made available to the application. Without this, log in attempts will fail.
Now if you re-run the application and try to navigate to /admin, you should be redirected to the home page, with an extra query string value in the
URL:

You have successfully enabled cookie-based authentication and protected a folder with it.
Securing Credentials
Instead of storing
credentials in a database, you will store them in the standard appSetting.json
file. However, just as you wouldn't store your password in a database in plain
text, you don't want to store it in a text file in plain sight either. So you
will use hashing to protect the password. That way, if anyone can access your appSettings
file, your password will be safe. You want the hash to be cryptographically
robust. Rather than concocting your own hashing algorithm, you should use one
that is written by experts who know what they are doing. There is a
PasswordHasher class in ASP.NET Identity that does the job perfectly. So you will create a console application that leverages it
to hash the password that will be stored in appSettings .
- Create a new .NET Core console application using VS, VS Code or the command line. It doesn't matter what you call it. This is a disposable utility.
- Add the Microsoft.AspNetCore.Identity package to it -
dotnet add
	package Microsoft.AspNetCore.Identity
from the command line, orinstall-package Microsoft.AspNetCore.Identityfrom the Package Manager Console in VS. - Change the code in Program.cs to look like this, supplying your own password where applicable. Note that subsequent attempt to match it will be case-sensitive:
- Run the application to check that a hashed value was generated. Keep the
application for later use.

You may notice if you run the application multiple times that it generates a different value each time for the same password. This is because the algorithm appends a "salt" to the password for hashing, ensuring that the hash will differ each time for the same password. This makes it infeasible for hackers to crack the actual password.
The PasswordHasher constructor and the HashPassword methods both take a generic parameter, representing the current user. The type parameter is not used by the default implementation. It has been made available for custom implementations. I have instantiated the
PasswordHasher with a string type, and then passed null into the
HashPassword method.
Storing Credentials
In this section, you will store your user credentials in a custom section in the appSettings.json file. You will also create a class representing the user so that you can work with the configuration values in a strongly typed manner.
- Create a folder named Models in the root of the application.
- Add a new C# class file to the Models folder and name it SiteUser.cs.
- Replace the existing content with the following:
- Add the
SiteUsersection to the appSettings.json file with the user name that you want to use, and the hashed password that you generated earlier:
Creating The Login Form
- Change the Index.cshtml.cs file in the Pages folder (not the one you
created in the Admin folder) so that the content looks like this:
You have added bound properties for the user name and password, which you have decorated with theDataTypedata annotation attribute, setting its value toPassword. This is so that the input tag helper generates to correct type of input.
You have injectedIConfigurationinto thePageModelso that you can use it to resolve the user credentials from appSettings. Having checked that the user name matches whatever was posted, you then instantiate an instance of thePasswordHasherthat you used in the console application, and passed the submitted password along with the hashed version obtained from the configuration file to itsVerifyHashedPasswordmethod.
Internally, this method unwraps the hashed value, extracting the salt, which is used to hash the submitted password. If the resulting hash matches the stored hash, the method returns aPasswordVerificationResultenumeration set toSuccess. - Change the Index.cshtml file in the Pages folder to include the
following log in form:
This is a standard form that makes use of Bootstrap 4. It has its method set topostso that credentials are not passed in the query string.
Now when you run the application and log in with the correct credentials, you should automatically be redirected to the admin page.
Summary
This walkthrough showed how to secure a simple application robustly without needing to store credentials in a database or use the data access side of the Identity framework. You have still used some extremely useful APIs provided by Identity to secure your credentials using code written by experts. You have used the same API to match submitted values to what has been stored. You have also seen how easy it is to include and configure cookie-based authentication, and to secure areas of the application from non-authenticated users.
