Managing Client-side libraries
More and more web sites these days benefit from the growing ecosystem of client side Javascript and CSS frameworks such as jQuery, Bootstrap, Angularjs etc. Traditionally, .NET developers with an interest in improving client-side productivity have used extensions for Visual Studio (Web Essentials) to work with these frameworks and have managed them via the .NET package management system, NuGet. Front-end developers working with other frameworks are more likely to use a system called Bower, which is a package manager specifically for managing client-side libraries which are located on GitHub. Bower was developed by the team at Twitter (who also produce Bootstrap), and is a Node.js application. Node.js is a cross-platform runtime environment for JavaScript applications. Its equivalent in ASP.NET 5 is the .Net Execution Environment (DNX). Visual Studio 2015 has incorporated many of the Web Essentials extension features and includes support for Node.js natively, which means that working with tools like Bower from within Visual Studio 2015 is pretty painless.
Using Bower
The first task you are likely to want to perform in any new standard MVC 6 site built with the Empty template is to install jQuery and its validation plugins, and Bootstrap. The following steps show how to use Bower to do that.
-
Begin by making sure that Show All Files is selected in Solution Explorer
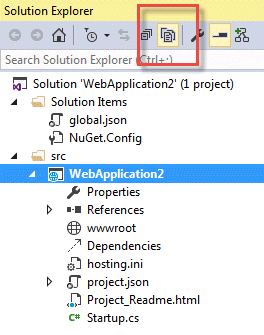
This is so you can see Visual Studio's integration with Bower in action. You don't have to do this every time you want to use Bower.
-
Right click on the web project's name in the
srcfolder and choose Add » New Item -
Make sure 'Client-side' is selected in the left hand pane of the templates dialog and choose Bower JSON Configuration File from the list presented to you.

-
Leave the name of the file as bower.json and click Add. Notice that a file named .bowerrc is also created. This is a configuration file used by Bower. Its format is (guess what) JSON, and it has one entry:
{
    "directory": "wwwroot/lib"
}
This specifies the path that Bower should use to save packages that it downloads. If this is not specified, Bower creates a folder called bower_components and creates a folder per vendor. This is the behaviour in previous ASP.NET 5 Beta templates.
-
In the dependencies section, start typing "bootstrap". You should notice that Intellisense is available:
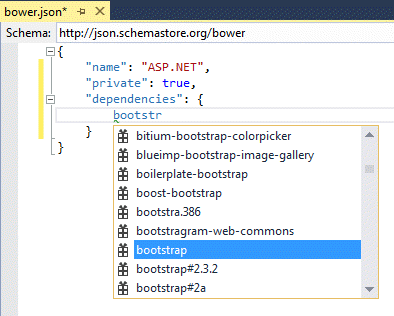
- Complete the entries so that they match the code below
{
    "name": "ASP.NET",
    "private": true,
    "dependencies": {
        "bootstrap": "3.0.0",
        "bootstrap-touch-carousel": "0.8.0",
        "hammer.js": "2.0.4",
        "jquery": "2.1.4",
        "jquery-validation": "1.11.1",
        "jquery-validation-unobtrusive": "3.2.2"
    }
}
-
Save the changes and watch Solution Explorer as Bower is added to the Dependencies section. At some point after (depending on the quality of your Internet connection), a lib folder will be added to wwwroot (as specified in the .bowerrc file) and will be populated by the packages you added to the
dependenciessection of bower.json.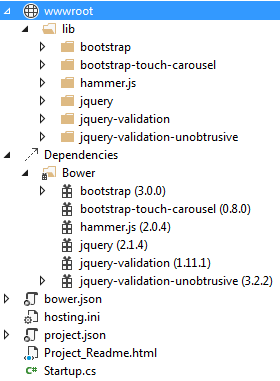
The values that appear after the names of the libraries in the bower.json file represent versions. You can use a wildcard (*) to represent the most recent version available. It is not strictly necessary to add an entry for jQuery, because it is required by Bootstrap and will be installed by Bower automatically because part of Bower's role is to manage any dependencies required by the libraries you choose. However, Bower will bring in the latest version of jQuery. The way to prevent that happening is to add an entry specifying a particular version as you have above.
NPM and Gulp
Previous versions of ASP.NET included a framework for minifying and bundling client-side script and style sheets files - System.Web.Optimization. As its name implies, it is dependent on System.Web, and therefore hasn't been included as part of ASP.NET 5. Rather than reinventing the wheel a second time, the ASP.NET team decided to incorporate a popular Node.js application to perform these tasks - Gulp.
Gulp is variously described as a build system or a task runner that you can use to automate the copying of files, bundling and minification, compiling LESS or SASS to CSS etc. as part of your build. There are other Node.js task runners available, but this particular tool has been chosen by the ASP.NET team as one of the options to include in Visual Studio. It uses streams when handling files, which is a lot more efficient than creating temporary copies. You obtain Gulp using npm - a package manager bundled with Node.js.
Using npm to install Gulp
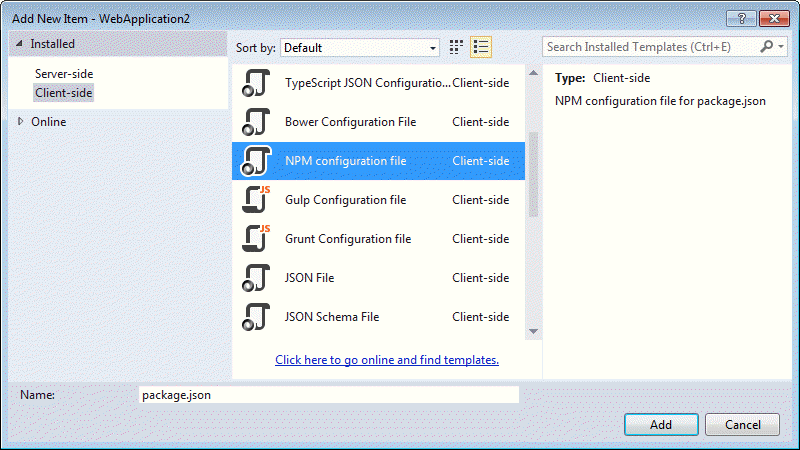
First, you need to get npm set up for the current project. Right click on the web project in Solution Explorer and select Add » New Item
-
Choose NPM Configuration File (package.json) from the available Client-side templates and click Add.
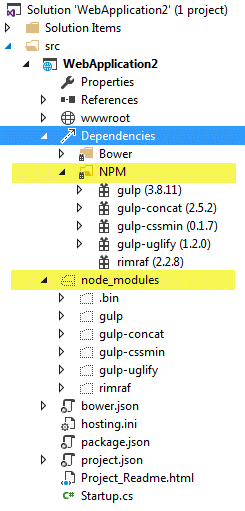
NPM appears in Dependencies node and a package.json file is added to the project with some default content:
{
    "version": "1.0.0",
    "name": "ASP.NET",
    "private": true,
    "devDependencies": {
    }
}
-
You make packages available to the project by adding it to the
devDependenciesnode. The following shows all the packages included in the Web Application template:{ "name": "ASP.NET", "version": "0.0.0", "devDependencies": { "gulp": "3.8.11", "gulp-concat": "2.5.2", "gulp-cssmin": "0.1.7", "gulp-uglify": "1.2.0", "rimraf": "2.2.8" } }
The packages include Gulp itself,
gulp-concatfor combining files,gulp-cssminfor minifying css files,gulp-uglifyfor minifying JavaScript files andrimraf- a utility for deleting files. -
Save the changes to package.json and a node_modules folder should appear (assuming you still have the Show All Files option selected) with ".bin" and "gulp" as entries
Configuring and using Gulp
In the Web Application template, a number of Gulp tasks have been configured although only one of them is actually executed. I will look at just that task for the sake of simplicity. Tasks are defined in a file named gulpfile.js.
Right click on the web project in Solution Explorer and select Add » New Item. From the templates dialog, select Gulp Configuration File and click Add. This will create a file called Gulpfile.js in the site.
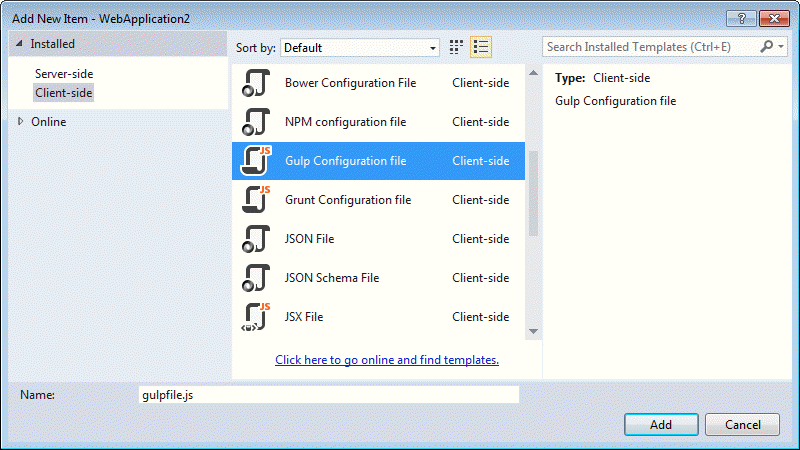
Replace the existing content of gulpfile.js with the following:
/// <binding Clean='clean' />

var gulp = require("gulp"),
    rimraf = require("rimraf"),
    concat = require("gulp-concat"),
    cssmin = require("gulp-cssmin"),
    uglify = require("gulp-uglify"),
    project = require("./project.json");

var paths = {
    webroot: "./" + project.webroot + "/"
};

paths.js = paths.webroot + "js/**/*.js";
paths.minJs = paths.webroot + "js/**/*.min.js";
paths.css = paths.webroot + "css/**/*.css";
paths.minCss = paths.webroot + "css/**/*.min.css";
paths.concatJsDest = paths.webroot + "js/site.min.js";
paths.concatCssDest = paths.webroot + "css/site.min.css";

gulp.task("clean:js", function (cb) {
    rimraf(paths.concatJsDest, cb);
});

gulp.task("clean:css", function (cb) {
    rimraf(paths.concatCssDest, cb);
});

gulp.task("clean", ["clean:js", "clean:css"]);

gulp.task("min:js", function () {
    gulp.src([paths.js, "!" + paths.minJs], { base: "." })
        .pipe(concat(paths.concatJsDest))
        .pipe(uglify())
        .pipe(gulp.dest("."));
});

gulp.task("min:css", function () {
    gulp.src([paths.css, "!" + paths.minCss])
        .pipe(concat(paths.concatCssDest))
        .pipe(cssmin())
        .pipe(gulp.dest("."));
});

gulp.task("min", ["min:js", "min:css"]);
The file begins with an XML-like comment that creates a binding for the task named "
clean" whenever you perform a Clean Solution action within Visual Studio. The task is defined further down the script. The dependencies you downloaded previously are referenced usingrequirestatements and passed to variables. A bunch of path locations are also stored in a JS object. The first task is called "clean:js" and it usesrimrafto delete the contents of the location defined asconcatJsDest, which is where combined JavaScript files will be stored. Another task takes care of the combined CSS file location. Then these tasks are combined into one task simply calledclean. Two further tasks are defined that minify the JavaScript and CSS files and these are combined into one task named "min".-
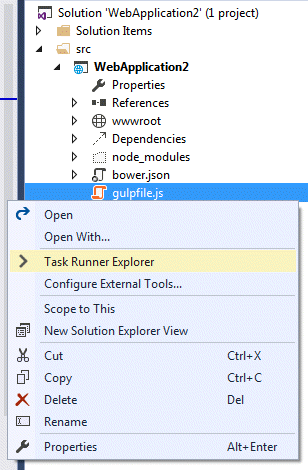
Right click on Gulpfile.js in Solution Explorer and select Task Runner Explorer
-
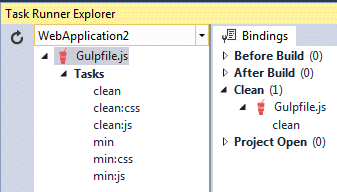
The image below shows the Task Runner explorer and illustrates the fact that the clean taks has been bound to the Clean event. You can bind tasks visually to three other events.
-
Right click in the min task, choose Bindings and select Clean

You should see this additional binding refleected in the XML-like coment at the top of gulpfile.js:
/// <binding Clean='clean, min' />
Summary
This article looked at the new tools incorporated into Visual Studio 2015 that make common client-side tools available to .NET developers. They have always been available (an extension exists for integrating them in VS 2013) but it is only with VS 2015 that they have become first class citizens. You saw how to use Bower to install Bootstrap and some jQuery libraries, and then you used Gulp to create and schedule tasks that combine and minify your CSS and JS files each time you clean the project. You have also seen the Task Runner Explorer, which is new ot Visual Studio 2015.
So far, you have an application that includes a number of client-side dependencies and can print "Hello World" to the browser. But it's not an MVC project yet. The next article in the series will review the new configuration system in ASP.NET 5 and see how services like Entity Framework and MVC itself are added to the project.
