For the purposes of this exercise, I shall be borrowing heavily from Imar Spaanjaar's N-Layer design article series presented here: Building Layered Web Applications with Microsoft ASP.NET 2.0. I would strongly recommend that you read the series of articles, or at least the first two to familiarise yourself with the basics of an N-Layer approach to ASP.NET application design. 3 key layers from that application: Business Objects, Business Logic and Data Access will be included in the following MVC application with little or no change at all, and the article series provides excellent detail on how the layers are constructed. This article will look at what role they play, but will not delve into their code in any real detail.
First we take a look at the application as presented by Imar. It's a simple one that typifies CRUD operations. It allows the user to manage Contacts, along with their addresses, telephone numbers and email addresses. It features the ability to Create, Read, Update and Delete any of the entities.
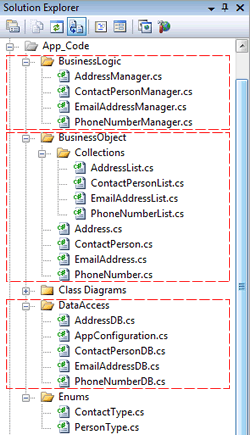
The Entities associated with the application are ContactPersons, PhoneNumbers, Addresses and EmailAddresses. They all live in the Business Objects (BO) layer of the application. Each of these classes contain public properties with getter and setter methods in the original sample. They do not feature any behaviour, which is housed within the Business Logic Layer (BLL) in entitynameManager classes. There's a one-to-one mapping between an Entity and its associated Manager class. Each of the manager classes contain methods that retrieve an instance of an entity, a collection of entities, to save an entity (update or add) and to delete an entity. This area of the application can also be used to apply validation, security etc, but that is not included in the sample so that it isn't too cluttered. If you would like to see validation etc in action within the BLL, have a look at Imar's 6 part series that features updates to the application including moving it to version 3.5 of the ASP.NET framework.
The final layer is the Data Access Layer (DAL). This layer also features classes that have a one to one mapping with the Manager classes in the BLL. The methods within the BLL actually call related methods in the DAL. The DAL methods are the only ones in the application that know what mechanism is used to persist (store) entities. In this case, it's a SQL Server Express database, so this set of classes makes use of ADO.NET and the SqlClient classes. The idea behind this approach is that if you need to swap your persistence mechanism (to use XML or Oracle, for example, or to call Web Services, or even to use Linq To SQL or another ORM), you only need to replace the DAL. So long as the new DAL exposes methods containing the same signature as those called from the BLL, everything should continue to work without having to change other areas of the application. Ensuring that any new DAL adheres to the existing method signatures can be achieved through the use of Interfaces, but that would be the topic of a future article... perhaps.
MVC Architecture
There are plenty of good articles that discuss the architecture of MVC applications, so this one will not go into serious detail. For a deeper look, I recommend visiting the Learn section of Microsoft's official ASP.NET MVC site. Briefly, though, the M is for Model, which is where the BO, BLL and DAL will live. The V is for View, which is essentially any UI-related development - or what the user sees, and the C is for Controller. Controllers co-ordinate the applications responses to requests made by users. If a user clicks a button that points to a specific URL, that request is mapped to a Controller Action (class method) that will be responsible for handle any logic required to service the request, and returning a response - typically a new View, or an update to the existing View.
Having created a new MVC application within Visual Studio and removed the default Views, and Controllers, the first thing I did was to copy the BO, BLL and DAL files from Imar's application to the Model area of my new app. I also copied the Sql Server database file from App_Data in the original site, into the same place within the MVC application, and did the same with the Style.css file, which was copied into the MVC Content folder.
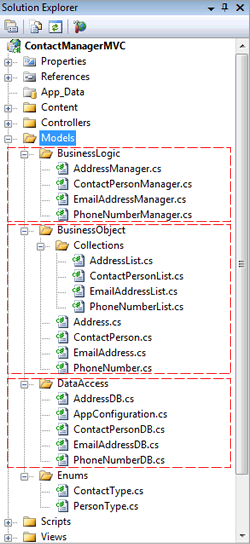
I made a few other modifications. The database connection string needed to be added to the MVC application's Web.Config file. In addition, I made couple of changes to the Namespaces within the copied class files, and updated some of the DAL code to C# 3.0, although neither of these amendments are strictly necessary. Once I had done that, I hit Ctrl + Shift + F5 to ensure that the project compiled. I will not need to revisit these files at all from now on, except for some DAL methods and their associated BLL methods, as will be covered later.
Controllers
I added four controllers (having removed the default ones provided by Visual Studio) - one for each Entity. These are ContactController, PhoneController, AddressController and EmailController.
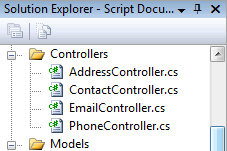
Each of the controllers will be responsible for coordinating 4 actions - List, Add, Edit and Delete. So the first thing I will do is register the Route for these actions within Global.asax:
public static void RegisterRoutes(RouteCollection routes)
{
  routes.IgnoreRoute("{resource}.axd/{*pathInfo}");

  routes.MapRoute(
      "Default",
      "{controller}/{action}/{id}",
      new { controller = "Contact", action = "List", id = "" }
  );
}
The default view for the application will be listing the contacts. Contact data is obtained by the existing GetList() method within the ContactPersonManager class in the BLL, so the code for the List() action is as follows:
public ActionResult List()
{
  var model = ContactPersonManager.GetList();
  return View(model);
}
Strongly Typed Views
I'm going to use strongly typed Views throughout the application because they provide for intellisense in the Views and don't rely on ViewData indexing by string, which is prone to errors. To tidy things up as I go on, I have added some namespaces (the ones below the default ones in bold) to the web.config <namespaces> section. These are the ones I used to replace the existing namespaces in Imar's code:
<namespaces>
<add namespace="System.Web.Mvc"/>
<add namespace="System.Web.Mvc.Ajax"/>
<add namespace="System.Web.Mvc.Html"/>
<add namespace="System.Web.Routing"/>
<add namespace="System.Linq"/>
<add namespace="System.Collections.Generic"/>
<add namespace="ContactManagerMVC.Views.ViewModels"/>
<add namespace="ContactManagerMVC.Models.BusinessObject"/>
<add namespace="ContactManagerMVC.Models.BusinessObject.Collections"/>
<add namespace="ContactManagerMVC.Models.BusinessLogic"/>
<add namespace="ContactManagerMVC.Models.DataAccess"/>
<add namespace="ContactManagerMVC.Models.Enums"/>
</namespaces>
This means they are available to all of the application and I don't need to fully qualify types within the Views. The type returned by the GetList() method is a ContactPersonList, which is set up in the Collections folder within the BO layer. It is simply a collection of ContactPerson objects. The Page declaration at the top of the List view is as follows:
<%@ Page Title="" Language="C#" MasterPageFile="~/Views/Shared/Site.Master"
    Inherits="System.Web.Mvc.ViewPage<ContactPersonList>" %>
You will also notice that I have included a MasterPage. Within the MasterPage, I have referenced the css file from Imar's sample code. The markup that manages the display of ContactPerson objects is as follows:
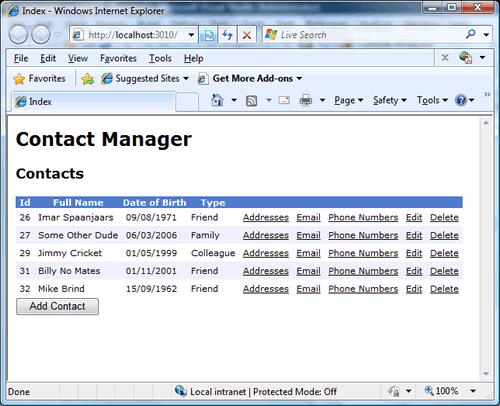
<table class="table"> <tr> <th scope="col">Id</th> <th scope="col">Full Name</th> <th scope="col">Date of Birth</th> <th scope="col">Type</th> <th scope="col"> </th> <th scope="col"> </th> <th scope="col"> </th> <th scope="col"> </th> <th scope="col"> </th> </tr> <% if (Model != null) { foreach (var person in Model) {%> <tr> <td><%= person.Id %></td> <td><%= person.FullName %></td> <td><%= person.DateOfBirth.ToString("d") %></td> <td><%= person.Type %></td> <td title="address/list" class="link">Addresses</td> <td title="email/list" class="link">Email</td> <td title="phone/list" class="link">Phone Numbers</td> <td title="contact/edit" class="link">Edit</td> <td title="contact/delete" class="link">Delete</td> </tr> <% } }else{%> <tr> <td colspan="9">No Contacts Yet</td> </tr> <% }%> </table>
You can immediately see the benefit of strong typing in the view. The Model is of type ContactPersonList, so each item is a ContactPerson and their properties are available without having to cast the Model to ContactPersonList. Incorrect casting is only detected at runtime, which can be inconvenient to say the least.
I cheated a little with the html. I could have selected "List" from the View Content option when generating the View, which would have provided some default templated html. I didn't. I wanted something that would work with Imar's css more easily, so I ran his application on my machine and once it was in the browser, Viewed Source and copied the rendered html from that. Imar uses GridViews in his web forms application, so a bit of css etc is automatically embedded within the source when they are rendered. I cleaned that up and moved the table styling to a css class called table over to the css file. I also added some additional styles for the <th> and <td> elements. You can see them in the accompanying download.
I also added some title attributes to some of the table cells. These are the ones that contain the links to other actions within the original application. I decided that I did not want the whole page to post back when addresses or phone numbers are viewed, or when the user wants to edit or delete existing records. I wanted the site to be Ajax-enabled. These title attributes play a key role in the Ajax (provided by jQuery) that feature in my version. The "link" css class makes text behave like a hyperlink, in that it is underlined and the cursor turns to a pointer (hand) onmouseover.
jQuery AJAX
Before looking at the main bulk of the script that manages Ajax functionality, here are three more lines of html that are added to the bottom of the List view:
<input type="button" id="addContact" name="addContact" value="Add Contact" />
<div id="details"></div>
<div id="dialog" title="Confirmation Required">Are you sure about this?</div>
The first is the button that allows users to add new contacts. The second is an empty div which is waiting for content and the third is part of the jQuery modal confirmation box that prompts users to confirm that they want to delete a record.
3 files in the Master page. One is the main jQuery file, and the other two are from the jQuery.Ui library. These are sued for a modal dialog and for a date picker:
<script src="../../Scripts/jquery-1.3.2.min.js" type="text/javascript"></script>
<script src="../../Scripts/ui.core.min.js" type="text/javascript"></script>
<script src="../../Scripts/jquery-ui.min.js" type="text/javascript"></script>
Here's the complete jQuery for the List view preceded by what the rendered view looks like:
<script type="text/javascript">
  $(function() {
    // row colours
    $('tr:even').css('background-color', '#EFF3FB');
    $('tr:odd').css('background-color', '#FFFFFF');
    // selected row managment
    $('tr').click(function() {
      $('tr').each(function() {
        $(this).removeClass('SelectedRowStyle');
      });
      $(this).addClass('SelectedRowStyle');
    });
    // hide the dialog div
    $('#dialog').hide();
    // set up ajax to prevent caching of results in IE
    $.ajaxSetup({ cache: false });
    // add an onclick handler to items with the "link" css class
    $('.link').live('click', function(event) {
      var id = $.trim($('td:first', $(this).parents('tr')).text());
      var loc = $(this).attr('title');
      // check to ensure the link is not a delete link
      if (loc.lastIndexOf('delete') == -1) {
        $.get(loc + '/' + id, function(data) {
          $('#details').html(data);
        });
      // if it is, show the modal dialog
      } else {
        $('#dialog').dialog({
          buttons: {
            'Confirm': function() {
              window.location.href = loc + '/' + id;
            },
            'Cancel': function() {
              $(this).dialog('close');
            }
          }
        });
        $('#dialog').dialog('open');
        }
      });
      // add an onclick event handler to the add contact button
      $('#addContact').click(function() {
        $.get('Contact/Add', function(data) {
          $('#details').html(data);
        });
      });
    });
</script>
This may look daunting, but as with all things jQuery, it is simple, and I have broken down the various parts through the use of comments to make it easier to follow. The first thing that the script does is to replace the AlternatingRowColor management that web forms provides on the server to data presentation controls. It applies css styling to rows once the table has been rendered. Then I have added some additional code to cater for the fact that Imar's original sample includes a way of highlighting the currently selected row. Then I have added one line to prevent IE caching results. If you don't do this, you will scratch your head wondering why edits and deletes do not show up in the browser while the records have clearly been changed in the database.
The next bit is interesting. It makes use of the .live() method, which ensures that event handlers are attached to all matching elements, whether they exist at the moment or not. When the user clicks an Addresses link for example, the result is another table listing the related phone numbers:
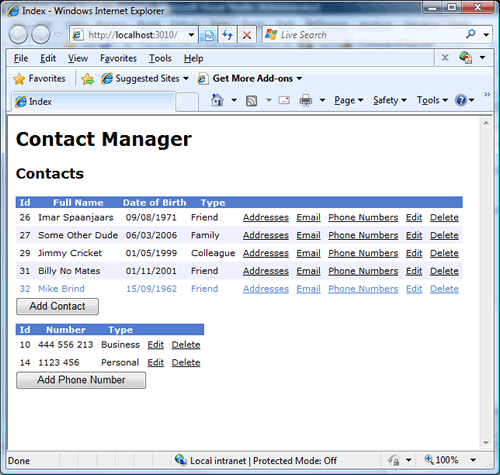
You can see that the table contains Edit and Delete links. If I didn't use .live(), these would not have event handlers attached. The event handler is attached to the click event of the cells decorated with the "link" class. It first obtains a value for the id of the record. In the case of the Contact Person table, that will be the ContactPersonId (it's the content of the first cell in the table row). In sub forms, it will be the id of the phone number or email address. These are needed when passed to the controller action responsible for editing, deleting or displaying. More of that later.
You should also now see why I have added title attributes to the table cells. They contain the route that needs to be invoked, and the full url is constructed by appending the id to the route. Next, a check is made to see if the route contains the word "delete". If not, a request is fired and the result is displayed in the details div. If it is a delete link, the modal confirmation box is invoked before the record is deleted, giving the user the option to change their mind. See? I said it was simple!
Finally an event handler is attached to the click event of the Add Contact button. We will have a look at this part next.
Adding Contacts and Custom View Models
When adding a record within an ASP.NET application, the customary practice is to present the user with a form containing a series of inputs via which they can supply values. Most of the inputs for a ContactPerson object are straightforward: first name, last name, date of birth. One of them is not so straightforward - Type. This value must be drawn from the enumeration defined within PersonType.cs (Friend, Colleague etc) in the enums folder within the Model. This means that we must present the user with a restricted selection of valid values. A DropDownList will do the job. However, a series of optional values forms no part of the existing ContactPerson object, so we need to present a customised version of the ContactPerson to the view to accommodate this. This is where customised View Models come in.
I've read some debate on where View Models should be placed within an application. Some people feel they are part of the model. My opinion is that they are related to views. They are only really relevant to MVC applications, and are not really reusable, so they should not go into the model. For that reason, I choose to create a ViewModels folder and add that under the Views folder. To that, I add a ContactPersonViewModel.cs file with the following code:
using System;
using System.Collections.Generic;
using System.Web.Mvc;

namespace ContactManagerMVC.Views.ViewModels
{
  public class ContactPersonViewModel
  {
    public int Id { get; set; }
    public string FirstName { get; set; }
    public string MiddleName { get; set; }
    public string LastName { get; set; }
    public DateTime DateOfBirth { get; set; }
    public IEnumerable<SelectListItem> Type { get; set; }
  }
}
Looking at the last property, you can see that I have made Type a collection of IEnumerable<SelectListItem>. This will be bound to the Html.DropDownList in the view.
There are two actions for adding within the controller. The first is decorated with the AcceptVerbs(HttpVerbs.Get) attribute while the second is marked with the AcceptVerbs(HttpVerbs.Post) attribute. The first is responsible for passing back a data entry form and the second handles the values that are posted when the form is submitted:
[AcceptVerbs(HttpVerbs.Get)]
public ActionResult Add()
{
  var personTypes = Enum.GetValues(typeof (PersonType))
    .Cast<PersonType>()
    .Select(p => new
                   {
                     ID = p, Name = p.ToString()
                   });
  var model = new ContactPersonViewModel
                {
                  Type = new SelectList(personTypes, "ID", "Name")
                };
  return PartialView(model);
}


[AcceptVerbs(HttpVerbs.Post)]
public ActionResult Add(ContactPerson person)
{
  ContactPersonManager.Save(person);
  return RedirectToAction("List");
}
The first few lines in the first action are responsible for transferring the values in the ContactType enumeration to an array, each item of which is then cast to an anonymous object having an ID property and a Name property. The ID is the enumeration value, and the Name is the constant value that goes with the enumeration. A ContactPersonViewModel object is instantiated, and the Type property has the IEnumerable of anonymous objects passed in to a SelectList object along with the data value values, and the data text values. I used a Partial View for adding a contact, selecting the strongly-typed option again and choosing ContactPersonViewModel for the type. The code for the partial follows:
<%@ Control Language="C#" Inherits="System.Web.Mvc.ViewUserControl<ContactPersonViewModel>" %>

<script type="text/javascript">
  $(function() {
  $('#DateOfBirth').datepicker({ dateFormat: 'yy/mm/dd' });
  });
</script>

<% using (Html.BeginForm("Add", "Contact", FormMethod.Post)) {%>
      <table>
        <tr>
          <td class="LabelCell">Name</td>
          <td><%= Html.TextBox("FirstName") %></td>
        </tr>
        <tr>
          <td class="LabelCell">Middle Name</td>
          <td><%= Html.TextBox("MiddleName") %></td>
        </tr>
        <tr>v
          <td class="LabelCell">Last Name</td>
          <td><%= Html.TextBox("LastName") %></td>
        </tr>
        <tr>
          <td class="LabelCell">Date of Birth</td>
          <td><%= Html.TextBox("DateOfBirth", String.Empty)%></td>
        </tr>
        <tr>
          <td class="LabelCell">Type</td>
          <td><%=Html.DropDownList("Type")%>
          </td>
        </tr>
        <tr>
          <td class="LabelCell"></td>
          <td><input type="submit" name="submit" id="submit" value="Save" /></td>
        </tr>
      </table>
<% } %>
The jQuery at the top attaches a jQuery UI date picker (calendar) to the DateOfBirth textbox. The second argument passed in to the Html Helper for the DateOfBirth text box ensures that by default, the value is empty. Otherwise, all the inputs are given the same name as the corresponding ContactPerson property we want to populate. This is to ensure that the default model binder works for us without any unnecessary messing around. The enum for ContactType is also bound automatically for us by MVC:
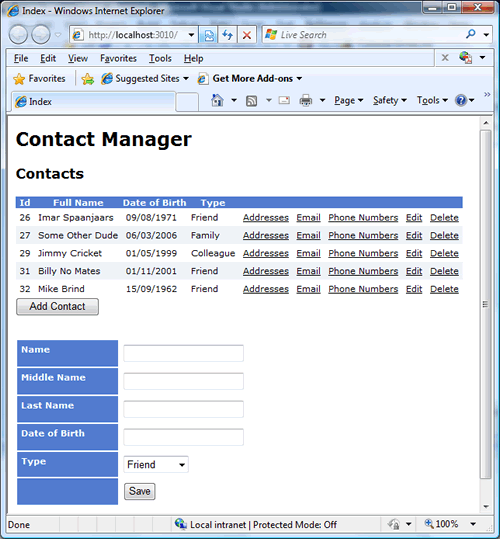
The method that responds to POST requests is then able to match the incoming Request.Form values to properties on a ContactPerson object, and then call the associated BLL Save() method with minimum code. This is followed by the page refreshing in response to a RedirectToAction call to the List action.
Editing a ContactPerson
Again, there are two actions on the controller for editing: one for the initial GET request and another for the POST submission:
[AcceptVerbs(HttpVerbs.Get)]
    public ActionResult Edit(int id)
    {
      var personTypes = Enum.GetValues(typeof (PersonType))
        .Cast<PersonType>()
        .Select(p => new { ID = p, Name = p.ToString() });

      var contactPerson = ContactPersonManager.GetItem(id);
      var model = new ContactPersonViewModel
                    {
                      Id = id,
                      FirstName = contactPerson.FirstName,
                      MiddleName = contactPerson.MiddleName,
                      LastName = contactPerson.LastName,
                      DateOfBirth = contactPerson.DateOfBirth,
                      Type = new SelectList(personTypes, "ID", "Name", contactPerson.Type)
                    };
      return PartialView(model);
    }

    [AcceptVerbs(HttpVerbs.Post)]
    public ActionResult Edit(ContactPerson person)
    {
      ContactPersonManager.Save(person);
      return RedirectToAction("List");
    }
We've already seen how jQuery is used to invoke the Edit action passing the ID of the person to be edited. That id is used to retrieve the person details from the database through the now familiar route of BLL calling DAL methods. The ContactPersonViewModel is constructed form the returned data, with the addition of the SelectList as in the Add method. This time though, the SelectList constructor features a third parameter, which is the actual Type for this person. The third argument in the constructor is the selected value.
The partial view code is again almost identical to the Add view:
<%@ Control Language="C#" Inherits="System.Web.Mvc.ViewUserControl<ContactPersonViewModel>" %>

<script type="text/javascript">
  $(function() {
    $('#DateOfBirth').datepicker({dateFormat: 'yy/mm/dd'});
  });
</script>

<% using (Html.BeginForm("Edit", "Contact", FormMethod.Post)) {%>
     <table>
        <tr>
          <td class="LabelCell">Name</td>
          <td><%= Html.TextBox("FirstName") %></td>
        </tr>
        <tr>
          <td class="LabelCell">Middle Name</td>
          <td><%= Html.TextBox("MiddleName") %></td>
        </tr>
        <tr>
          <td class="LabelCell">Last Name</td>
          <td><%= Html.TextBox("LastName") %></td>
        </tr>
        <tr>
          <td class="LabelCell">Date of Birth</td>
          <td><%= Html.TextBox("DateOfBirth", Model.DateOfBirth.ToString("yyyy/MM/dd")) %></td>
        </tr>
        <tr>
          <td class="LabelCell">Type</td>
          <td><%= Html.DropDownList("Type")%></td>
        </tr>
        <tr>
          <td class="LabelCell"><%= Html.Hidden("Id") %></td>
          <td><input type="submit" name="submit" id="submit" value="Save" /></td>
        </tr>
      </table>
<% } %>
The key differences are that the DateOfBirth field now contains a format string for displaying the date in a friendly way. Added to that is the Html.Hidden() helper near the submit button, which has the value of the person being edited. Oh, and of course the form is targeted at a different action to the Add form. There is an argument possibly for combining the Add and Edit forms and action, and using a token to detect the mode that the form is in (Add or Edit) to conditionally set some of the mark up in a combined partial view, and to control the code within the combined action. It would reduce a fair amount of repetition. I have separated them out in this sample for the sake of clarity primarily.
Deleting a ContactPerson
The delete action is straightforward, and there is no View associated wtih it. There doesn't need to be. Just going back to the List action will refresh the data:
public ActionResult Delete(int id)
{
  ContactPersonManager.Delete(id);
  return RedirectToAction("List");
}
This is where I chose to make a change to the original BLL and DAL. The original ContactPersonManager.Delete() method takes an instance of the person to be deleted. Within the DAL Delete() method, only the id of the person is referenced (or needed). I see no point in passing in whole objects when you are referencing them by their unique id, so I amended the methods to accept an int. It also makes the code easier, as I would otherwise have to instantiate the ContactPerson object just to get rid of it.
The jQuery invokes the confirmation modal dialog when a Delete link is clicked.
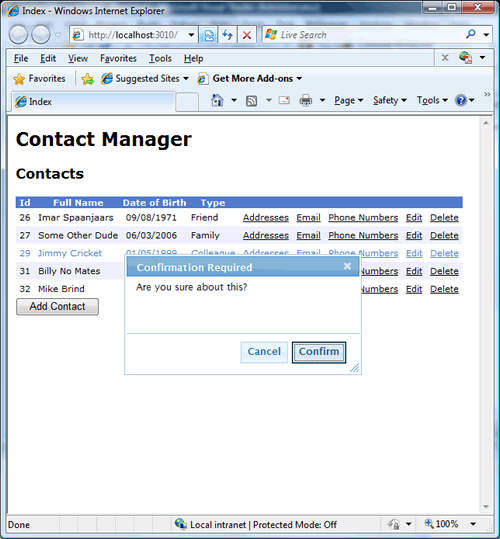
If the Cancel button is clicked, nothing happens (apart from the modal closing). If the Confirm button is clicked, the url that was constructed from the jQuery is invoked pointing to the delete action.
Managing the Collections
All of the collections - PhoneNumberList, EmailAddressList and AddressList are managed in exactly the same way as each other. Consequently, I shall just pick one (EmailAddressList) to illustrate the methodology. You can examine the download to see exactly how the others work.
First, we will look at displaying the Email Addresses associated with the selected ContactPerson. This involves a List action on the controller:
public ActionResult List(int id)
{
  var model = new EmailAddressListViewModel
                {
                  EmailAddresses = EmailAddressManager.GetList(id),
                  ContactPersonId = id
                };
  return PartialView(model);
}
The method takes the id of the contact (from the first cell in the row that's been clicked, if you remember) and returns another custom view model - EmailAddressListViewModel. This is so that the Id of the contact person can be passed in to the View:
<%@ Control Language="C#" Inherits="System.Web.Mvc.ViewUserControl<EmailAddressListViewModel>" %> <script type="text/javascript"> $(function() { $('#add').click(function() { $.get('Email/Add/<%= Model.ContactPersonId %>', function(data) { $('#details').html(data); }); }); }); </script> <table class="table"> <tr> <th scope="col">Contact Person Id</th> <th scope="col">Email</th> <th scope="col">Type</th> <th scope="col"> </th> <th scope="col"> </th> </tr> <%if(Model.EmailAddresses != null) {foreach (var email in Model.EmailAddresses) {%> <tr> <td><%= email.Id %></td> <td><%= email.Email %></td> <td><%= email.Type %></td> <td title="email/edit" class="link">Edit</td> <td title="email/delete" class="link">Delete</td> </tr> <%} }else {%> <tr> <td colspan="9">No email addresses for this contact</td> </tr> <%}%> </table> <input type="button" name="add" value="Add Email" id="add" />
You can see that the ContactPersonId is needed for the Add method. We need to make sure we are adding a new item to the correct contact's collection. Otherwise the Edit and Delete methods work in exactly the same was as for the ContactPerson itself - the id of the item to be amended or deleted is passed in via the URL, and the table cells are set up with a title attribute so that they can take advantage of the .live() method that was deployed earlier in the List view for the contacts.
[AcceptVerbs(HttpVerbs.Get)]
public ActionResult Add(int id)
{
  var contactTypes = Enum.GetValues(typeof(ContactType))
    .Cast<ContactType>()
    .Select(c => new
    {
      Id = c,
      Name = c.ToString()
    });
  var model = new EmailAddressViewModel
                {
                  ContactPersonId = id,
                  Type = new SelectList(contactTypes, "ID", "Name")
                };
  return PartialView("Add", model);
}


[AcceptVerbs(HttpVerbs.Post)]
public ActionResult Add(EmailAddress emailAddress)
{
  emailAddress.Id = -1;
  EmailAddressManager.Save(emailAddress);
  return RedirectToAction("List", new {id = emailAddress.ContactPersonId});
}
A custom View Model has been created for this purpose of displaying existing EmailAddress objects for editing and adding. This includes the same kind of property for binding an IEnumerable<SelectListItem> collection for the Type dropdown. Where these methods differ from their ContactController counterparts is in what they return. The first returns the Add form as a partial, while the second Redirects to the List action on the same controller, which results in the revised collection being updated (and is also the reason why the no-cache option was set in the original Ajax).
In the case of the collection items, each one has its Id set to -1 within the action before it is saved. This is to ensure that the correct flow of code takes control in the "Upsert" stored procedure. By default at the moment, a value is picked up from the RouteData id parameter (which is that belonging to the ContactPerson) so if it is not set to -1, any EmailAddress object with the same id as the current contact will be updated instead. This is because Imar employed the "Upsert" approach to adding and editing data within the one procedure. More information can be found on this by reviewing his articles. In the meantime, here is the Partial View for adding an email address:
<%@ Control Language="C#" Inherits="System.Web.Mvc.ViewUserControl<EmailAddressViewModel>" %>

<script type="text/javascript">
  $(function() {
    $('#save').click(function() {
      $.ajax({
        type: "POST",
        url: $("#AddEmail").attr('action'),
        data: $("#AddEmail").serialize(),
        dataType: "text/plain",
        success: function(response) {
          $("#details").html(response);
        }
      });
    });
  });
</script>

<% using(Html.BeginForm("Add", "Email", FormMethod.Post, new { id = "AddEmail" })) {%>
<table class="table">
<tr>
  <td>Email:</td>
  <td><%= Html.TextBox("Email")%></td>
</tr>
<tr>
  <td>Type:</td>
  <td><%= Html.DropDownList("Type") %></td>
</tr>
<tr>
  <td><%= Html.Hidden("ContactPersonId") %></td>
  <td><input type="button" name="save" id="save" value="Save" /></td>
</tr>
</table>
<% } %>
The jQuery in this particular instance takes care of submitting the form via AJAX. It is attached to an html button (not an input type="submit", you notice). It serializes the contents of the form fields and effects a POST request to the Add() action decorated by the appropriate AcceptVerbs attribute.
Editing and Deleting EmailAddress objects
Editing EmailAddress obejcts involves actions and views that are very similar to the ones that have been shown before. There are again two actions on the controller - one for GET and one for POST:
[AcceptVerbs(HttpVerbs.Get)]
public ActionResult Edit(int id)
{
  var emailAddress = EmailAddressManager.GetItem(id);
  var contactTypes = Enum.GetValues(typeof(ContactType))
    .Cast<ContactType>()
    .Select(c => new
    {
      Id = c,
      Name = c.ToString()
    });
  var model = new EmailAddressViewModel
  {
    Type = new SelectList(contactTypes, "ID", "Name", emailAddress.Type),
    Email = emailAddress.Email,
    ContactPersonId = emailAddress.ContactPersonId,
    Id = emailAddress.Id
  };
  return View(model);
}

[AcceptVerbs(HttpVerbs.Post)]
public ActionResult Edit(EmailAddress emailAddress)
{
  EmailAddressManager.Save(emailAddress);
  return RedirectToAction("List", "Email", new { id = emailAddress.ContactPersonId });
}
And the Partial View for the edit should also be quite familiar by now:
<%@ Control Language="C#" Inherits="System.Web.Mvc.ViewUserControl<EmailAddressViewModel>" %>

<script type="text/javascript">
  $(function() {
    $('#save').click(function() {
      $.ajax({
        type: "POST",
        url: $("#EditEmail").attr('action'),
        data: $("#EditEmail").serialize(),
        dataType: "text/plain",
        success: function(response) {
          $("#details").html(response);
        }
      });
    });
  });
</script>

<% using(Html.BeginForm("Edit", "Email", FormMethod.Post, new { id = "EditEmail" })) {%>
<table class="table">
<tr>
  <td>Email:</td>
  <td><%= Html.TextBox("Email")%></td>
</tr>
<tr>
  <td>Type:</td>
  <td><%= Html.DropDownList("Type") %></td>
</tr>
<tr>
  <td><%= Html.Hidden("ContactPersonId") %><%= Html.Hidden("Id") %></td>
  <td><input type="button" name="save" id="save" value="Save" /></td>
</tr>
</table>
<% } %>
This is again almost identical to the Add view, except for the addition of a hidden field for the actual EmailAddress.Id value which ensures that the right email address gets updated. the Delete action requires no real explanation:
public ActionResult Delete(int id)
{
  EmailAddressManager.Delete(id);
  return RedirectToAction("List", "Contact");
}
Summary
The object of this exercise was to demonstrate that MVC applications are perfectly possible without Linq To SQL or the Entity Framework. I took an existing ASP.NET 2.0 web forms application that had been nicely layered, and re-used the Business Objects, Business Logic and the Data Access Layers with little or no amendments. The DAL still uses ADO.NET and invokes stored procedures against the SQL Server database.
Along the way, I have shown how to use strongly typed View Models and a bit of natty jQuery to smooth the UI experience for the user. It's not a perfect application by any means, and is most definitely not ready for the real world. There is much room for improvement in terms of refactoring the views and actions to combine add and edit operations. The application lacks any kind of validation. Delete operations all result in showing the opening page again, whereas it would be nicer when deleting items in the phone, email or address collections to redisplay the revised sub form instead. This requires passing in the ContactPersonId to the action and should be relatively easy to achieve.
