The main problem with iTextSharp is that it lacks documentation. There are some basic tutorials available, but most programmers have to resort to trying to wrestle with the documentation provided for the Java version - iText - to get going with the component, or you may want to purchase the book iText In Action. However, this only provides guidance in Java. Many of the code samples are transferable to C# without a lot of modification, but if you are relatively new to C#, you may frequently become frustrated with undocumented or inexplicable differences in classes and method names between the two versions. So, as part of a series of How To articles, here's how to get started using iTextSharp with code samples in C#.
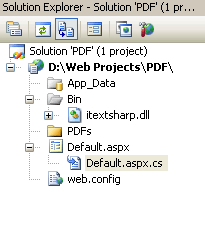
First thing to do is to install the Nuget package.. The dll will be copied to your Bin directory, and is now available to the web site or project. Note that this link takes you to an older version of iTextSharp (4.1.6) instead of the later version 5 releases. The reason for that is that version 5 is available under a different licence that requires you to either make all of the source code of your application available as open source, or to purchase a commercial licence to use iTextSharp in commercial projects. Version 4 does not apply those restrictions. All of the articles I have written about iTextSharp are based on version 4.1.6 in any event, and they may not work with version 5.

I have also added a folder called PDFs in which I plan to store my generated files. To avoid typing full references to the dll, it is best to add a couple of using statements to the default ones in your code-behind:
using iTextSharp.text;
using iTextSharp.text.pdf;
You will also want to reference System.IO, as you will be creating, opening and closing files, and classes in this namespace are required.
The principal object within iTextSharp is the Document object. You need to create an instance of this to be able to work with your PDF in memory. So, the first thing to do is to instantiate one:
var doc1 = new Document();
This creates a PDF document object in memory with the default settings. The size of the document by default is A4 (which measures 210mm x 297mm, or 8.26 inches x 11.69 inches). Margins are set at half an inch all round. The next thing to do is to commit the document to disk. The iTextSharp.text.pdf.PdfWriter class is required for this:
//use a variable to let my code fit across the page...
string path = Server.MapPath("PDFs");
PdfWriter.GetInstance(doc1, new FileStream(path + "/Doc1.pdf", FileMode.Create));
Now to begin actually working with the document, open it, and add a new paragraph, then close it:
doc1.Open();
doc1.Add(new Paragraph("My first PDF"));
doc1.Close();
That's it! If you refresh the PDFs folder in your web site, you will see that a new item - Doc1.pdf - has been added, and opening it will reveal your success.
It may be, however, that you don't want to always create a PDF with the default size and margins, so iTextSharp provides ways for you to customise these settings. There are 2 further constructors to the Document object:
public Document(iTextSharp.text.Rectangle pageSize);
public Document(iTextSharp.text.Rectangle pageSize, float, float, float, float);
The first one can be used like this:
var doc = new Document(PageSize.A5);
The PageSize class contains a number of Rectangle objects representing the most common paper sizes from A0 to A10, B0 to B10, LEGAL, LEDGER, LETTER, POSTCARD, TABLOID and so on. If you want to apply a custom size that isn't available within the PageSize class, you define your own Rectangle object, set its properties and pass that into the constructor as an argument:
var doc = new Document(new Rectangle(100f, 300f));
PdfWriter.GetInstance(doc, new FileStream(path + "/Doc2.pdf", FileMode.Create));
doc.Open();
doc.Add(new Paragraph("This is a custom size"));
doc.Close();
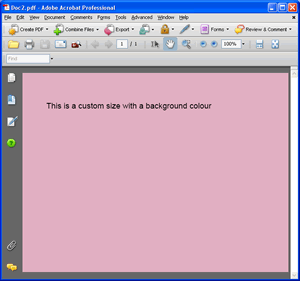
In this case, a PDF document was created with the width being 100 points, and the height set at 300 points. There are 72 points to an inch, so this particular document isn't very large. It's in fact 1.39 inches x 4.17 inches. (You will probably find that as well as iTextSharp.dll, a calculator will be very handy....).
The second constructor which takes a Rectangle object and a series of 4 float values allows you to set your custom margins through the floats. Again, these values are measured in points. The default half inch margins are 36 points.
If you use the PageSize class constructor, or a Rectangle directly, you can also set the background colour of the document. This can be done using RGB colour values, or CMYK (Cyan - a kind of blue, Magenta - a pinkish red, Yellow and "Key", or black). It used to be that if you wanted to prepare a PDF for printing by a professional lithographic printer, you had to ensure that all colours were CMYK, but with greater adoption of digital printing by printing companies, RGB is becoming more acceptable. Certainly, for display on the web, RGB is preferred. To set the background colour, we use the BackgroundColorproperty of the Rectangle object:
r.BackgroundColor = new CMYKColor(25, 90, 25, 0);
r.BackgroundColor = new Color(191, 64, 124);
Both of the above result in a rather fetching pinkish colour for the document.

This article has introduced iTextSharp, and should have provided a starting point. Subsequent articles examine a range of functionality and features offered by this rather natty component. They can be found here:
- Working with Fonts
- Adding Text with Chunks, Phrases and Paragraphs
- Lists with iTextSharp
- Links and Bookmarks
- Introducing Tables
- Working with images
- Drawing shapes and Graphics
- Page Layout with Columns
