This tutorial series will teach you the basics of building an ASP.NET MVC 5 Web application using Visual Studio 2013 and Visual Basic. A Visual Studio Express For Web project with VB source code is available to accompany this series which you can download.
The tutorial series comprises 11 sections in total. They cover the basics of web development using the ASP.NET MVC framework and the Entity Framework for data access. They are intended to be followed sequentially as each section builds on the knowledge imparted in the previous sections. The navigation path through the series is as follows:
- Getting Started
- Adding a Controller
- Adding a View
- Adding a Model
- Creating a Connection String and Working with SQL Server LocalDB
- Accessing Your Model's Data from a Controller
- Examining the Edit Methods and Edit View
- Adding Search
- Adding a New Field
- Adding Validation
- Examining the Details and Delete Methods
3. Adding a View
In this section you're going to modify the HelloWorldController class to use view template files to cleanly encapsulate the process of generating HTML responses to a client.
You'll create a view template file using the Razor view engine. Razor-based view templates have a .vbhtml file extension, and provide an elegant way to create HTML output using Visual Basic. Razor minimizes the number of characters and keystrokes required when writing a view template, and enables a fast, fluid coding workflow.
Currently the Index method returns a string with a message that is hard-coded in the controller class. Change the Index method to return a View object, as shown in the following code:
Function Index() As ActionResult
    Return View()
End Function
The Index method above uses a view template to generate an HTML response to the browser. Controller methods (also known as action methods), such as the Index method above, generally return an ActionResult (or a class derived from ActionResult), not primitive types like string.
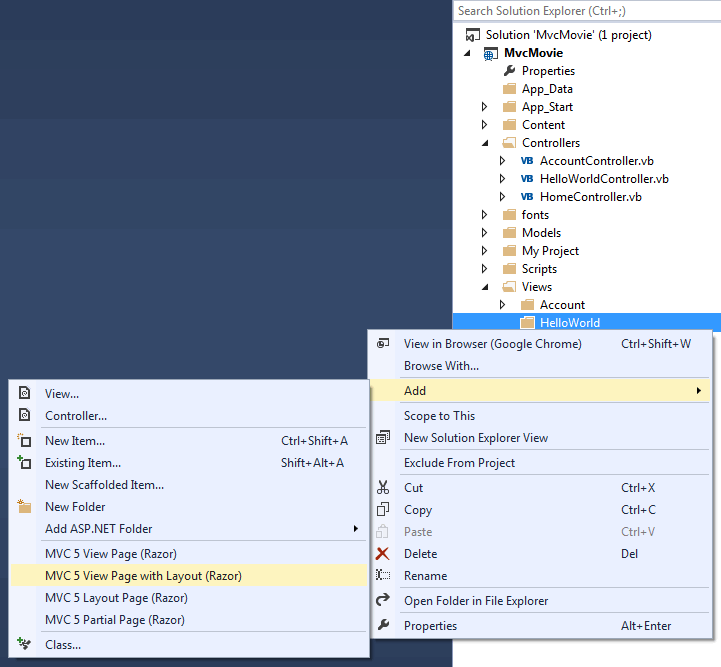
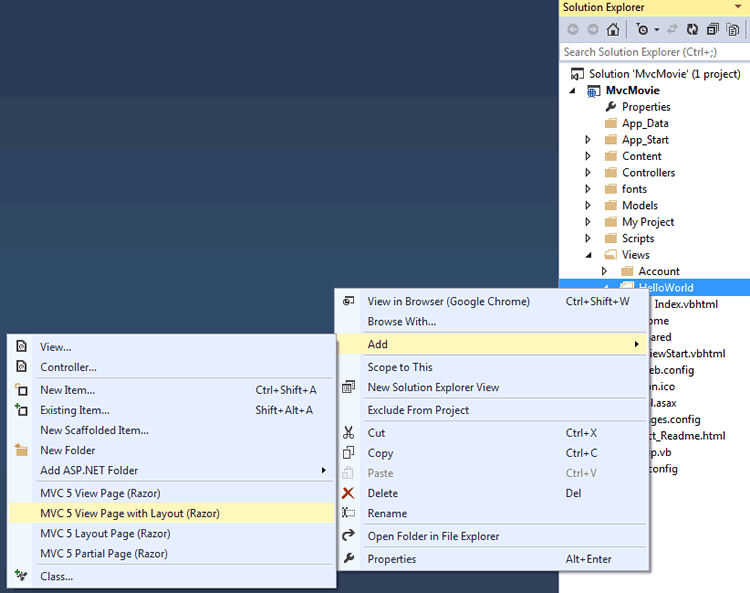
Right click the Views\HelloWorld folder and click Add, then click MVC 5 View Page with (Layout Razor).
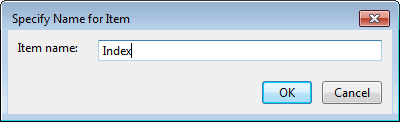
In the Specify Name for Item dialog box, enter Index, and then click OK.
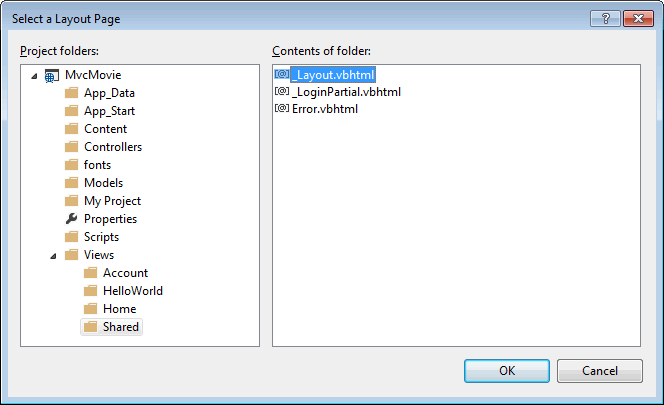
In the Select a Layout Page dialog, accept the default _Layout.vbhtml and click OK.

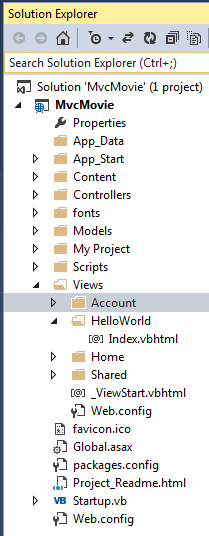
In the dialog above, the Views\Shared folder is selected in the left pane. If you had a custom layout file in another folder, you could select it. We'll talk about the layout file later in the tutorial. In the meantime, the MvcMovie\Views\HelloWorld\Index.vbhtml file is created.
Add the following highlighed markup.
@Code
    Layout = "~/Views/Shared/_Layout.vbhtml"
    ViewBag.Title = "Index"
End Code

<h2>Index</h2>

<p>Hello from our View Template!</p>
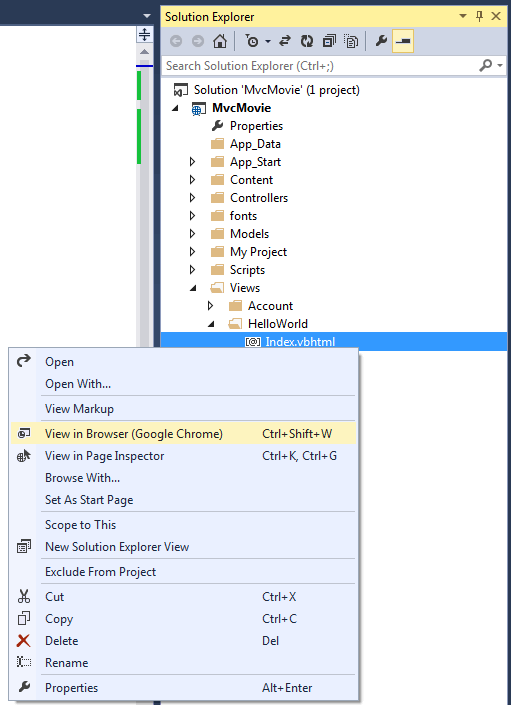
Right click the Index.vbhtml file and select View in Browser.
You can also right click the Index.vbhtml file and select View in Page Inspector. See the Page Inspector tutorial for more information.
Alternatively, run the application and browse to the HelloWorld controller (http://localhost:xxxx/HelloWorld). TheIndex method in your controller didn't do much work; it simply ran the statement Return View(), which specified that the method should use a view template file to render a response to the browser. Because you didn't explicitly specify the name of the view template file to use, ASP.NET MVC defaulted to using the Index.vbhtml view file in the\Views\HelloWorld folder. The image below shows the string "Hello from our View Template!" hard-coded in the view.
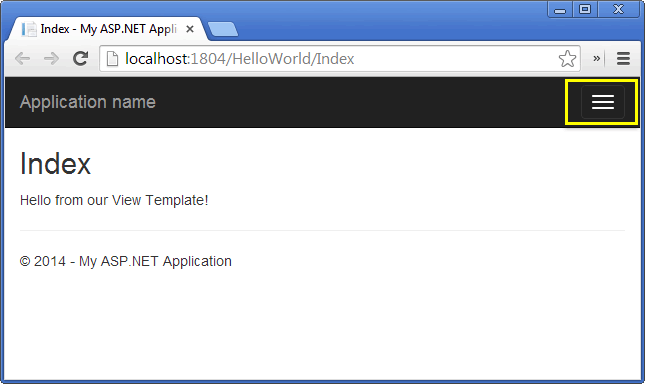
Looks pretty good. However, notice that the browser's title bar shows "Index My ASP.NET Appli" and the big link on the top of the page says "Application name." Depending on how small you make your browser window, you might need to click the three bars in the upper right to see the to the Home, About, Contact, Register and Log in links.
Changing Views and Layout Pages
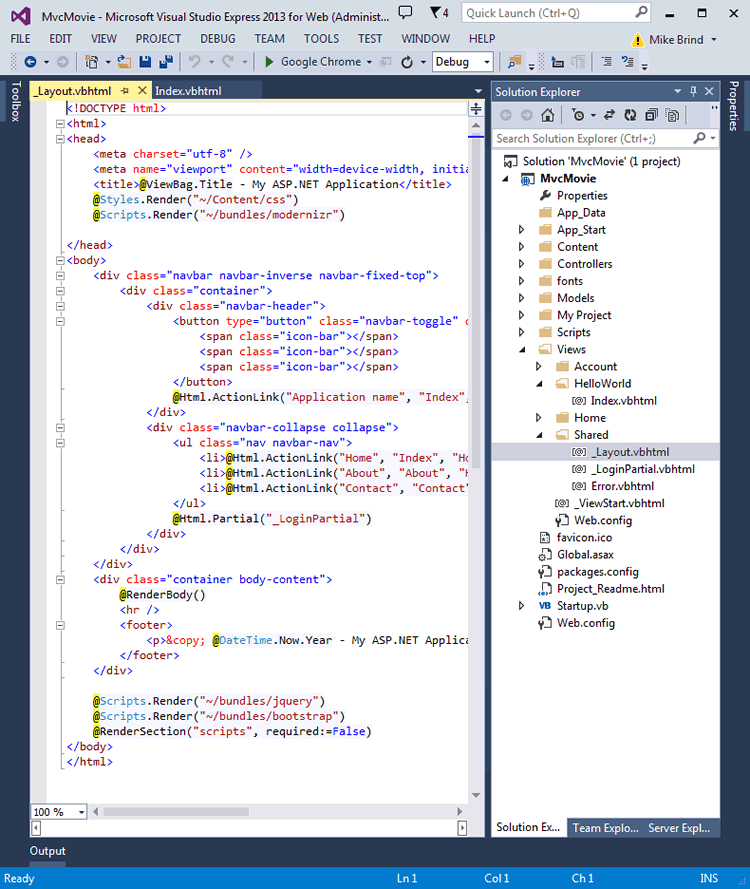
First, you want to change the "Application name" link at the top of the page. That text is common to every page. It's actually implemented in only one place in the project, even though it appears on every page in the application. Go to the /Views/Shared folder in Solution Explorer and open the _Layout.vbhtml file. This file is called a layout page and it's in the shared folder that all other pages use.
Layout templates allow you to specify the HTML container layout of your site in one place and then apply it across multiple pages in your site. Find the @RenderBody() line. RenderBody is a placeholder where all the view-specific pages you create show up, "wrapped" in the layout page. For example, if you select the About link, theViews\Home\About.vbhtml view is rendered inside the RenderBody method.
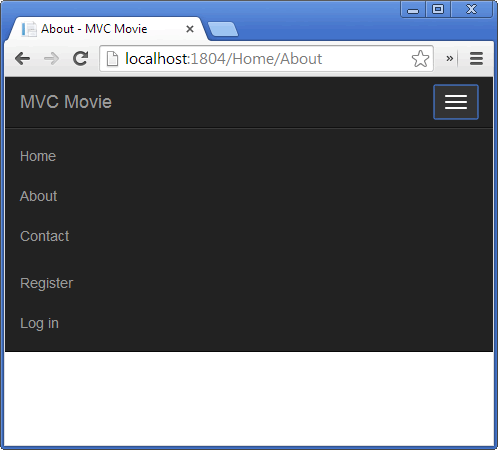
Change the contents of the title element. Change the ActionLink in the layout template from "Application name" to "MVC Movie" and the controller from Home to Movies. The complete layout file is shown below:
<!DOCTYPE html> <html> <head> <meta charset="utf-8" /> <meta name="viewport" content="width=device-width, initial-scale=1.0"> <title>@ViewBag.Title - MVC Movie</title> @Styles.Render("~/Content/css") @Scripts.Render("~/bundles/modernizr") </head> <body> <div class="navbar navbar-inverse navbar-fixed-top"> <div class="container"> <div class="navbar-header"> <button type="button" class="navbar-toggle" data-toggle="collapse" data-target=".navbar-collapse"> <span class="icon-bar"></span> <span class="icon-bar"></span> <span class="icon-bar"></span> </button> @Html.ActionLink("MVC Movie", "Index", "Movies", Nothing, New With {.[class] = "navbar-brand"}) </div> <div class="navbar-collapse collapse"> <ul class="nav navbar-nav"> <li>@Html.ActionLink("Home", "Index", "Home")</li> <li>@Html.ActionLink("About", "About", "Home")</li> <li>@Html.ActionLink("Contact", "Contact", "Home")</li> </ul> @Html.Partial("_LoginPartial") </div> </div> </div> <div class="container body-content"> @RenderBody() <hr /> <footer> <p>© @DateTime.Now.Year - My ASP.NET Application</p> </footer> </div> @Scripts.Render("~/bundles/jquery") @Scripts.Render("~/bundles/bootstrap") @RenderSection("scripts", required:=False) </body> </html>
Run the application and notice that it now says "MVC Movie ". Click the About link, and you see how that page shows "MVC Movie", too. We were able to make the change once in the layout template and have all pages on the site reflect the new title.
When we first created the Views\HelloWorld\Index.vbhtml file, it contained the following code:
@Code
    Layout = "~/Views/Shared/_Layout.vbhtml"
End Code
The Razor code above explictly sets the layout page. Examine the Views\_ViewStart.vbhtml file; it contains the exact same Razor markup. The Views\_ViewStart.vbhtml file defines the common layout that all views will use Therefore you can comment out or remove that code from the the individual view files such as Views\HelloWorld\Index.vbhtml.
@Code
    'Layout = "~/Views/Shared/_Layout.vbhtml"
    ViewBag.Title = "Index"
End Code

<h2>Index</h2>

<p>Hello from our View Template!</p>
You can use the Layout property to set a different layout view, or set it to Nothing so no layout file will be used.
Now, let's change the title of the Index view.
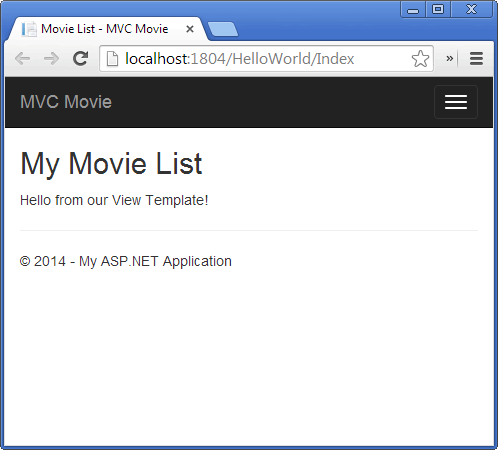
Open MvcMovie\Views\HelloWorld\Index.vbhtml. There are two places to make a change: first, the text that appears in the title of the browser, and then in the secondary header (the <h2> element). You'll make them slightly different so you can see which bit of code affects which part of the app.
@Code
    ViewBag.Title = "Movie List"
End Code

<h2>My Movie List</h2>

<p>Hello from our View Template!</p>
To indicate the HTML title to display, the code above sets a Title property of the ViewBag object (which is in the Index.vbhtml view template). Notice that the layout template (Views\Shared\_Layout.vbhtml ) uses this value in the<title> element as part of the <head> section of the HTML that we modified previously.
<!DOCTYPE html>
<html>
<head>
    <meta charset="utf-8" />
    <meta name="viewport" content="width=device-width, initial-scale=1.0">
    <title>@ViewBag.Title - MVC Movie</title>
    @Styles.Render("~/Content/css")
    @Scripts.Render("~/bundles/modernizr")

</head>
Using this ViewBag approach, you can easily pass other parameters between your view template and your layout file.
Run the application. Notice that the browser title, the primary heading, and the secondary headings have changed. (If you don't see changes in the browser, you might be viewing cached content. Press Ctrl+F5 in your browser to force the response from the server to be loaded.) The browser title is created from the ViewBag.Title we set in the Index.vbhtml view template and the additional "- MVC Movie" added in the layout file.
Also notice how the content in the Index.vbhtml view template was merged with the _Layout.vbhtml view template and a single HTML response was sent to the browser. Layout templates make it really easy to make changes that apply across all of the pages in your application.
Our little bit of "data" (in this case the "Hello from our View Template!" message) is hard-coded, though. The MVC application has a "V" (view) and you've got a "C" (controller), but no "M" (model) yet. Shortly, we'll walk through how create a database and retrieve model data from it.
Passing Data from the Controller to the View
Before we go to a database and talk about models, though, let's first talk about passing information from the controller to a view. Controller classes are invoked in response to an incoming URL request. A controller class is where you write the code that handles the incoming browser requests, retrieves data from a database, and ultimately decides what type of response to send back to the browser. View templates can then be used from a controller to generate and format an HTML response to the browser.
Controllers are responsible for providing whatever data or objects are required in order for a view template to render a response to the browser. A best practice: A view template should never perform business logic or interact with a database directly. Instead, a view template should work only with the data that's provided to it by the controller. Maintaining this "separation of concerns" helps keep your code clean, testable and more maintainable.
Currently, the Welcome action method in the HelloWorldController class takes a name and a numTimes parameter and then outputs the values directly to the browser. Rather than have the controller render this response as a string, let’s change the controller to use a view template instead. The view template will generate a dynamic response, which means that you need to pass appropriate bits of data from the controller to the view in order to generate the response. You can do this by having the controller put the dynamic data (parameters) that the view template needs in a ViewBag object that the view template can then access.
Return to the HelloWorldController.vb file and change the Welcome method to add a Message and NumTimes value to the ViewBag object. ViewBag is a dynamic object, which means you can put whatever you want in to it; the ViewBag object has no defined properties until you put something inside it. The ASP.NET MVC model binding system automatically maps the named parameters (name and numTimes) from the query string in the address bar to parameters in your method. The complete HelloWorldController.vb file looks like this:
Imports System.Web.Mvc

Public Class HelloWorldController
    Inherits Controller

    Function Index() As ActionResult
        Return View()
    End Function

    Function Welcome(name As String, Optional numTimes As Integer = 1) As ActionResult
        ViewBag.Message = "Hello " & name
        ViewBag.NumTimes = numTimes
        Return View()
    End Function
End Class
Now the ViewBag object contains data that will be passed to the view automatically. Next, you need a Welcome view template! In the Build menu, select Build Solution (or Ctrl+Shift+B) to make sure the project is compiled. Right click the Views\HelloWorld folder and click Add, then click MVC 5 View Page with (Layout Razor).
In the Specify Name for Item dialog box, enter Welcome, and then click OK.
In the Select a Layout Page dialog, accept the default _Layout.vbhtml and click OK.
The MvcMovie\Views\HelloWorld\Welcome.vbhtml file is created.
Replace the markup in the Welcome.vbhtml file. You'll create a loop that says "Hello" as many times as the user says it should. The complete Welcome.vbhtml file is shown below.
@Code
    ViewBag.Title = "Welcome"
End Code
<h2>Welcome</h2>

<ul>
    @For i = 1 To ViewBag.NumTimes
        @<li>@ViewBag.Message</li>
    Next
</ul>
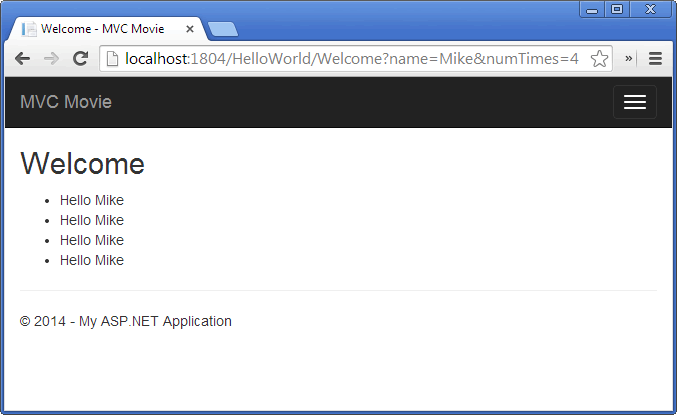
Run the application and browse to the following URL:
http://localhost:xx/HelloWorld/Welcome?name=Mike&numtimes=4
Now data is taken from the URL and passed to the controller using the model binder. The controller packages the data into a ViewBag object and passes that object to the view. The view then displays the data as HTML to the user.
In the sample above, we used a ViewBag object to pass data from the controller to a view. Later in the tutorial series, we will use a View Model to pass data from a controller to a view. The view model approach to passing data is generally much preferred over the view bag approach because it allows you to work with strongly typed data. See the blog entry View Model Design And Use In Razor Views for more information.
Well, that was a kind of an "M" for model, but not the database kind. In the next section, you will begin to work with structured data and create a database of movies.
