You would consider using nested layout pages if you were building a corporate site for a global company, for instance, which is comprised on many divisions, each having their own look and feel. There may be a common look and feel for the header and footer of the site, but the navigation and content changes in both structure and appearance depending on which division of the company is being featured. The imaginary company that the sample site relates to has a number of divisions, one of which is Automation and another for Electronics. Each of them has their own branding which needs ot be catered for. For simplicity's sake the following walkthrough illustrates the use of Razor in a Web Pages site built using WebMatrix, but the principals are exactly the same if you are using ASP.NET MVC 3.
Step 1
Create a new site using the Empty Site template and name this Nested Layouts. Add two folders to the site – one called Content and the other called Shared. Add a new CSS file to Content and leave it with the default file name of StyleSheet.css. Add the following code to it:
body {
    font-family: Arial, Helvetica, sans-serif;
    font-size: 80%;
    padding: 0;
    margin: 0;
}

h1{
    color: #0093c0;
}

#wrapper{
    background-color: #c1dfde;
    padding: 10px;
    width: 800px;
    margin: auto;
    min-height: 600px;
}

#electronics, #automation{
    min-height: 400px;
}

#electronics{
    background-color: #8ec1da;
    width: 650px;
    float: left;
}

#automation{
    background-color: #ffe8d3;
}

#electronicsnav{
    background-color: #fff;
    min-height: 400px;
    width: 150px;
    float: left;
}

#automationnav{
    background-color: #dedede;
}

#automation h3{
    color: #997d63;
}
Step 2
Add a CSHTML file to the Shared folder and name it _MainLayout.cshtml. Change the existing code so that it looks like this:
<!DOCTYPE html>
<html lang="en">
    <head>
        <meta charset="utf-8" />
        <title>@Page.Title</title>
        <link href="@Href("~/Content/StyleSheet.css")" rel="stylesheet" type="text/css" />
    </head>
    <body>
        <div id="wrapper">
            <div id="header"><h1>Global Enterprises</h1></div>
            <div id="nav">
                <a href="Home">Home</a> |
                <a href="About">About</a> |
                <a href="Engineering">Engineering</a> |
                <a href="Electronics">Electronics</a> |
                <a href="Automation">Automation</a> |
                <a href="Contact">Corporate</a> |
                <a href="Contact">Contact Us</a>
            </div>
                @RenderBody()
        </div>
    </body>
</html>
Step 3
Add another CSHTML file to the Shared folder and name this one _AutomationLayout.cshtml. Replace the existing code with this:
@{
    Layout = "~/Shared/_MainLayout.cshtml";
}
<div id="automationnav">
    <a href="Products">Products</a> |
    <a href="Services">Services</a> |
    <a href="Support">Support</a> |
    <a href="Team">The Team</a> |
</div>
<div id="automation">
    @RenderBody()
</div>
<div id="footer">The Automation Division Footer</div>
Step 4
Now add a third CSHTML file to the Shared folder. Name it _ElectronicsLayout.cshtml, delete the existing code and add the following:
@{
    Layout = "~/Shared/_MainLayout.cshtml";
}
<div id="electronicsnav">
    <a href="Products">Products</a> <br />
    <a href="Services">Services</a> <br />
    <a href="Support">Support</a> <br />
    <a href="Team">The Team</a> <br />
</div>
<div id="electronics">
    @RenderBody()
</div>
<div id="footer">The Electronics Division Footer</div>
Step 5
Add a CSHTML file to the root folder. Name this one Automation.cshtml and replace the existing code with this:
@{
    Layout = "~/Shared/_AutomationLayout.cshtml";
    Page.Title = "Automation";
}
<h3>Automation Home Page</h3>
Step 6
Finally, add another CSHTML file to the root folder and call it Electronics.cshtml. Replace the existing code with the following:
@{
    Layout = "~/Shared/_ElectronicsLayout.cshtml";
    Page.Title = "Electronics";
}
<h3>Electronics Home Page</h3>
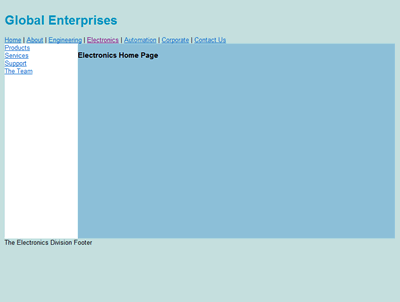
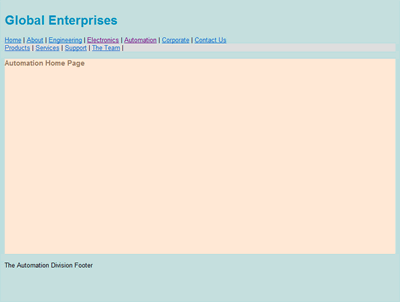
Making sure that the Electronics page is selected in the left pane, click the Run button to launch the page in your browser. Notice that the second navigation has a white background and the main area has a blue background. Click the Automation link in the top navigation. See how the colours change? The main content is a brownish-pink colour as is the secondary navigation. The heading in the main content area changes colour too. Most obviously, the Electronics navigation is displayed vertically whereas the Automation navigation is horizontal.
What defines a Layout page is a call to the RenderBody method. In this exercise you created a layout page from _MainLayout.cshtml by placing @RenderBody() in the file, and by matching that with Layout declarations in both the _AutomationLayout.cshtml and ElectronicsLayout.cshtml files. You also added calls to RenderBody in both of those files, thus turning them into layout pages. Electronics.cshtml and Automation.cshtml each contained Layout declarations pointing to their own layout page, completing the content – layout relationship. There is no limit to the number of levels to which you can nest layout pages.
The design of the pages won’t win any awards, but this sample serves to illustrate that nesting layout pages can offer a very flexible solution to certain problems.
A small sample containing the code in full can be downloaded here
