Create PDFs in ASP.NET - getting started with iTextSharp
iTextSharp - Working with Fonts
iTextSharp - Adding Text with Chunks, Phrases and Paragraphs
Lists with iTextSharp
iTextSharp - Links and Bookmarks
iTextSharp - Introducing Tables
iTextSharp supports all the main image types: jpg, tif, gif, bmp, png and wmf. There are a number of ways to create images with iTextSharp using the Image.GetInstance() method. Probably the most used option will be to pass a filesystem path and file name into the method:
string pdfpath = Server.MapPath("PDFs");
string imagepath = Server.MapPath("Images");
Document doc = new Document();
try
{
PdfWriter.GetInstance(doc, new FileStream(pdfpath + "/Images.pdf", FileMode.Create));
doc.Open();
doc.Add(new Paragraph("GIF"));
Image gif = Image.GetInstance(imagepath + "/mikesdotnetting.gif");
doc.Add(gif);
}
catch (Exception ex)
{
//Log error;
}
finally
{
doc.Close();
}
Alternative constructors that you may use include passing a URL or a System.Drawing.Image object (as opposed to an iTextSharp.text.Image). Note - the following snippet that System.Drawing.Image.FromStream() method shows the use of namespace aliasing again (sd.Image.FromStream(fs)), as was highlighted in the article Lists with iTextSharp to avoid clashes with the two different types of Image object:
doc.Add(new Paragraph("JPG"));
string url = "http://localhost:1805/PDF/Images/mikesdotnetting.jpg";
Image jpg = Image.GetInstance(new Uri(url));
doc.Add(jpg);
doc.Add(new Paragraph("PNG"));
using (FileStream fs = new FileStream(imagepath + "/mikesdotnetting.png", FileMode.Open))
{
Image png = Image.GetInstance(sd.Image.FromStream(fs),ImageFormat.Png);
doc.Add(png);
}
It's difficult to tell from the images I have provided so far, but the resolution of the resulting images in the PDF file is not that great. By default, images are embedded at 72 dpi (Dots Per Inch) which coincidentally, matches the number of points in an inch. If this file was being prepared for printing, the final job would be a bit nasty. Generally, commercial printers require that colour images for printing have a resolution of 300 dpi. To achieve this, you can scale the image to 24%. What you are actually trying to do is squeeze 300 pixels into the space that 72 normally occupies. 72/300 * 100 = 24%. The image stays the same in terms of file size but occupies less space in the document.
doc.Add(new Paragraph("TIF Scaled to 300dpi"));
Image tif = Image.GetInstance(imagepath + "/mikesdotnetting.tif");
tif.ScalePercent(24f);
doc.Add(tif);
Now, I have a large tif file that I want to use as a logo on an A4 letterhead. It measures 300 x 890 pixels. So at the default 72 dpi, it will measure 4.17 inches wide by12.36 inches deep. Increasing the resolution to 300 dpi will reduce the width to 1 inch, and the depth to 2.97 inches (72 points by 213.6 points). That part is fine. We can do that using the code above. Now I want to place the 300 dpi image in a particular position on the page. I have in mind the top right hand corner. The SetAbsolutePosition() method will do this, but I need to get a calculator out.
SetAbsolutePosition() accepts 2 floats as parameters. The first represents the co-ordinate along the X-axis, which starts at the left hand edge of the document and finishes at the right hand edge of the document. The second represents the Y-axis co-ordinate which starts from the bottom of the document and goes to the top. An A4 document is 595 points wide and 842 pixels high with a 36 point margin all around by default.
The actual co-ordinate that needs to be passed in is the bottom left of the image position. This image will butt right up to the right-hand margin. The image is 72 points wide (1 inch) + the margin at 36 points (total 108 points) from the right hand edge of the document, or 595 - 108 = 487 points along the X-axis. The Y-axis co-ordinate is the height of the image + the margin away from the top of the document, or 842 - (213.6 + 36) = 592.4 points from the bottom. Cripes. I don't really want to have to remember all the various sizes of different documents and do these calculations every time I want to set the absolute position of an element. And fortunately, I don't have to. I can use the Document.PageSize object to do the work for me.
Image tif = Image.GetInstance(imagepath + "/verticallogo.tif");
tif.ScalePercent(24f);
tif.SetAbsolutePosition(doc.PageSize.Width - 36f - 72f,
doc.PageSize.Height - 36f - 216.6f);
doc.Add(tif);
doc.PageSize.Width gives me the width in points of the document, and I just remove the margin (36 points) and the width of the image (72 points) for the X-axis co-ordinate, and the margin and height of the image from the total height of the document for the Y-axis co-ordinate.

Got my company logo in :-)
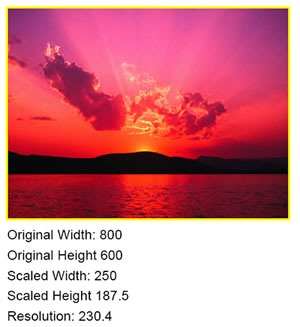
Another scenario that might need to be catered for is to fit a user-supplied image into a fixed size box somewhere on a form. I've pinched the Sunset image that I found in the Sample Images folder in My Pictures that comes as part of the default install of WindowsXP to illustrate how to use the ScaleToFit() method to achieve this. The following code takes an image of 800 x 600 and forces it to resize, maintaining its aspect ratio, into a rectangle measuring 250 points square.
Image jpg = Image.GetInstance(imagepath + "/Sunset.jpg");
jpg.ScaleToFit(250f, 250f);
jpg.Border = Rectangle.BOX;
jpg.BorderColor = Color.YELLOW;
jpg.BorderWidth = 5f;
doc.Add(jpg);
doc.Add(new Paragraph("Original Width: " + jpg.Width.ToString()));
doc.Add(new Paragraph("Original Height " + jpg.Height.ToString()));
doc.Add(new Paragraph("Scaled Width: " + jpg.ScaledWidth.ToString()));
doc.Add(new Paragraph("Scaled Height " + jpg.ScaledHeight.ToString()));
float Resolution = jpg.Width / jpg.ScaledWidth * 72f;
doc.Add(new Paragraph("Resolution: " + Resolution));
I have also taken the opportunity to add a yellow border to the embedded image, which is 5 points wide, and then shown the original dimensions, followed by the scaled dimensions, and the resulting resolution of the image. And here's the result:
If you use SetAbsolutePosition() you end up with the same effect as if you had set the Alignment property of the image to Image.UNDERLYING, in that text added to the document will run over the top of it. Unless you want to achieve this kind of watermark effect, you need to use Image.TEXTWRAP instead.
Image jpg = Image.GetInstance(imagepath + "/Sunset.jpg");
Paragraph paragraph = new Paragraph(@"Lorem ipsum dolor sit amet, consectetuer adipiscing elit. Suspendisse blandit blandit turpis. Nam in lectus ut dolor consectetuer bibendum. Morbi neque ipsum, laoreet id; dignissim et, viverra id, mauris. Nulla mauris elit, consectetuer sit amet, accumsan eget, congue ac, libero. Vivamus suscipit. Nunc dignissim consectetuer lectus. Fusce elit nisi; commodo non, facilisis quis, hendrerit eu, dolor? Suspendisse eleifend nisi ut magna. Phasellus id lectus! Vivamus laoreet enim et dolor. Integer arcu mauris, ultricies vel, porta quis, venenatis at, libero. Donec nibh est, adipiscing et, ullamcorper vitae, placerat at, diam. Integer ac turpis vel ligula rutrum auctor! Morbi egestas erat sit amet diam. Ut ut ipsum? Aliquam non sem. Nulla risus eros, mollis quis, blandit ut; luctus eget, urna. Vestibulum vestibulum dapibus erat. Proin egestas leo a metus?");
paragraph.Alignment = Element.ALIGN_JUSTIFIED;
jpg.ScaleToFit(250f, 250f);
jpg.Alignment = Image.TEXTWRAP | Image.ALIGN_RIGHT;
jpg.IndentationLeft = 9f;
jpg.SpacingAfter = 9f;
jpg.BorderWidthTop = 36f;
jpg.BorderColorTop = Color.WHITE;
doc.Add(jpg);
doc.Add(paragraph);
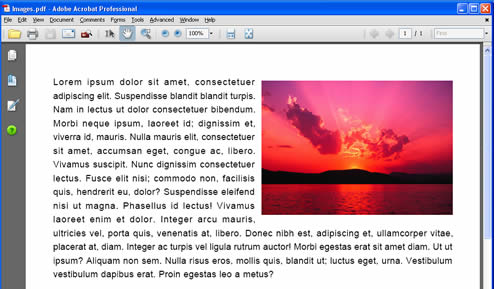
In this instance, I added a white border to the image to align it with the top of the text, and a bit of padding to the left and bottom of the image to stop the text running right up to its edge. Left and Right padding can be added using the IndentationLeft and IndentationRight properties, while SpacingBefore and SpacingAfter is used to pad the top and bottom. You may ask why I didn't use SapcingBefore instead of adding a white border, and that's a good question. The fact is that whatever I set the value to for SpacingBefore, it seemed to have no effect whatsover in this instance. I have no idea why this should be, but if anyone does, I'll be pleased to hear from them.
One final thing with images - you can rotate them if you need to. One way to do this is to set the Rotation property, which takes a float. The float value represents an angle measured in Radians. If you did more Mathematics than I did at school, you may be comfortable with this, but if you are like me and ask "What??", you can either read this article on Radians and work out that a quarter turn (90°) is Pi / 2, or simply set the RotationDegrees property instead. Rotation by default is anti-clockwise. The following are equally valid and equivalent:
jpg.Rotation = (float)Math.PI / 2;
jpg.RotationDegrees = 90f;
